Quantcast
Channel: free – Svetlin Nakov – Official Web Site and Blog
Viewing all 21 articles
Browse latest View live

Svetlin Nakov – Books

$
0
0
nakov books header

Read online Svetlin Nakov’s books

Introduction to Programming with C# book - front cover Introduction to Programming with Java book - front cover Programming for .NET Framework book - front cover Internet Programming with Java book - front cover Java for Digitally Signing Documents on the Web book - front cover

Introduction to Programming with C#

The book Introduction to Programming with C# is fundamental computer programming book that focuses on the concepts of the computer programming, data structures and algorithms. It is the recommended start for junior developers and is entirely free. Table of contents:

  • Chapter 0. Preface
  • Chapter 1. Introduction to Programming
  • Chapter 2. Primitive Types and Variables
  • Chapter 3. Operators and Expressions
  • Chapter 4. Console Input and Output
  • Chapter 5. Conditional Statements
  • Chapter 6. Loops
  • Chapter 7. Arrays
  • Chapter 8. Numeral Systems
  • Chapter 9. Methods
  • Chapter 10. Recursion
  • Chapter 11. Creating and Using Objects
  • Chapter 12. Exceptions Handling
  • Chapter 13. Strings
  • Chapter 14. Defining Classes
  • Chapter 15. Text Files
  • Chapter 16. Linear Data Structures
  • Chapter 17. Trees and Graphs
  • Chapter 18. Dictionaries, Hash Tables and Sets
  • Chapter 19. Data Structures: Comparison and Best Practices
  • Chapter 20. Object-Oriented Programming Principles
  • Chapter 21. High-Quality Programming Code
  • Chapter 22. How to Solve Programming Tasks?
  • Chapter 23. Practical Problems for Programming Exam – Topic 1
  • Chapter 24. Practical Problems for Programming Exam – Topic 2
  • Chapter 25. Practical Problems for Programming Exam – Topic 3

The book is available in Bulgarian only and is freely downloadable as PDF and MS Word file.

Introduction to Programming with Java

The book Introduction to Programming with Java is fundamental computer programming book that focuses on the concepts of the computer programming, data structures and algorithms. It is the recommended start for junior developers and is entirely free. Table of contents:

  • Chapter 0. Preface
  • Chapter 1. Introduction to Programming
  • Chapter 2. Primitive Types and Variables
  • Chapter 3. Operators and Expressions
  • Chapter 4. Console Input and Output
  • Chapter 5. Conditional Statements
  • Chapter 6. Loops
  • Chapter 7. Arrays
  • Chapter 8. Numeral Systems
  • Chapter 9. Methods
  • Chapter 10. Recursion
  • Chapter 11. Creating and Using Objects
  • Chapter 12. Exceptions Handling
  • Chapter 13. Strings
  • Chapter 14. Defining Classes
  • Chapter 15. Text Files
  • Chapter 16. Linear Data Structures
  • Chapter 17. Trees and Graphs
  • Chapter 18. Dictionaries, Hash Tables and Sets
  • Chapter 19. Data Structures: Comparison and Best Practices
  • Chapter 20. Object-Oriented Programming Principles
  • Chapter 21. High-Quality Programming Code
  • Chapter 22. How to Solve Programming Tasks?
  • Chapter 23. Example Topic from Exam in NASD – 30.09.2005
  • Chapter 24. Example Topic from Exam in NASD – 8.04.2006
  • Chapter 25. Example Topic from Exam in NASD – 11.12.2005

The book is available in Bulgarian only and is freely downloadable as PDF and MS Word file.

Programming for .NET Framework

Visit the web site of my book “Programming for .NET Framework“. The book is an unique tutorial for .NET Framework developers with C#. It covers fully the most important topic of the .NET technologies:

  • .NET Framework Architecture
  • C# Programming Language
  • Object-Oriented Concepts in .NET
  • Exceptions Handling
  • .NET Common Type System (CTS)
  • Delegates and Events
  • Attributes
  • Arrays and Collections
  • Strings and Unicode
  • Regular Expressions
  • Input and Output
  • Working with XML
  • Relational Databases and MS SQL Server
  • Data Access with ADO.NET
  • Windows Forms GUI Programming
  • ASP.NET Web Applications
  • Threads and Concurrency
  • Internet Access
  • Reflection
  • Serialization
  • Web Services
  • Remoting
  • Interoperability and Unmanaged Code
  • Memory and Resource Management
  • Assemblies and Deployment
  • .NET Security
  • Mono – Open Source .NET implementation
  • Programming Tools for .NET Developers
  • Practical Project

The book is available in Bulgarian only and is freely downloadable as PDF and MS Word file.

Internet Programming with Java

Visit the web site of my book “Internet Programming with Java“. The book introduces the reader to the most important concepts of the programming for the Internet with the Java language and related technologies. It covers following topics:

  • Multithreading and Synchronization;
  • Java Socket Programming – development of Internet applications that communicate through TCP/IP protocols;
  • Java Applets;
  • J2EE Web Applications – Web application development with JSP/Servlets technologies and deployment on the Tomcat server.

The book is available in Bulgarian only and is freely downloadable as PDF and MS Word file.

Java for Digitally Signing Documents on the Web

Visit the web site of my book “Java for Digitally Signing Documents on the Web“. The book introduces the reader to the techniques for digitally signing documents in a Web browser environment with a Java applet. The book presents the PKI (digital signatures, certificates, etc.), the PKI related API in Java and the smart card support in Java 5. The NakovDocumentSigner framework for signing documents with PKCS#12 certificate keystore and with a smart card is presented.

The book is available in Bulgarian only and is freely downloadable as PDF and MS Word file.


High-Quality Code Course – Open for All Universities in Sofia

$
0
0

I am happy to announce that I and my team of experienced speakers will teach the “High Quality Code Construction” course again starting in February. The course will be held in Sofia University at the Faculty of Mathematics and Informatics and in parallel in the Telerik Academy (for students from TU-Sofia, NBU and UNIBIT). Students from all universities and even school students are invited to attend this course. The course is free and is open, without any obligations for the attendees.

The course “High-Quality Programming Code” provides fundamental principles and practices for building high-quality software with focus on the source code, unit testing and refactoring. The course is held as elective training in few Bulgarian universities and targets the students from the computer science related specialties.

Course Annotation

The „High-quality programming code” course objective is to introduce the students to the principles of high-quality programming code construction during the software development process. The quality of the code is discussed in its most important characteristics – correctness, readability and maintainability. The principles of construction of high-quality class hierarchies, classes and methods are explained. Two fundamental concepts – “loose coupling” and “strong cohesion” are defined and their effect on the construction of classes and subroutines is discussed. Some advices for correctly dealing with the variables and data are given, as well as directions for correct naming of the variables and the rest elements of the program. Best practices for organization of the logical programming constructs are explained. Some methodologies for testing, debugging and code optimization are introduced. Special attention is given also to the “refactoring” as a technique for improving the quality of the existing code, unit testing and test-driven development. The principles of good formatting of the code are defined and explained. The concept of “self-documenting code” as a programming style is introduced. The techniques and practices for constructing high-quality programming code discussed in the course are independent of the programming languages. To graduate the course students are assigned two practical projects and a test examination. The practical projects consist of refactoring existing low-quality code, making the code testable, adding unit tests and measuring the code coverage to ensure the code is well tested.

Certification and Awards

Best students will get certification signed by the trainers team and will be awarded by our sponsor – Telerik Corp.

Curriculum

  1. Course Overview. Introduction to High-Quality Programming Code. Entrance Project
  2. Fundamentals of Software Engineering
  3. Naming Identifiers in the Source Code. Naming Classes, Methods, Variables, Parameters and Other Elements of the Code
  4. Designing High-Quality Classes and Class Hierarchies. Best Practices in the Object-Oriented Design
  5. High-Quality Methods. Strong Cohesion and Loose Coupling
  6. Using Variables, Data, Expressions and Constants Correctly
  7. Using Control Structures, Conditional Statements and Loops Correctly
  8. Correctly Formatting the Code. Code Documentation, Comments and Self-Documenting Code. Code Conventions
  9. Defensive Programming. Using Exceptions Correctly. Performance Tuning and Code Optimization
  10. Code Integration. Refactoring Existing Code to Improve Its Quality
  11. Software Quality Assurance. Testing and Debugging. Unit Testing. Test-Driven Development
  12. Development Tools. Development Environments. Change Management Systems. Code Analysis Tools. Automated Testing Tools. Automated Build Tools. Continuous Integration Tools
  13. Test Covering the All Studied Topics
  14. Course Projects: Assignment, Guidelines and Discussion
  15. How to Become a Ninja Developer?

Trainers

Eligible Students

The course will be held in parallel for students in the following universities:

  • Faculty of Mathematics and Informatics (FMI), Sofia University “St. Kliment Ohridski” (SU)
  • Technical University – Sofia
  • New Bulgarian University (NBU)
  • University of Library Studies and Information Technologies (UNIBIT)

Timetable

The course will be held:

  • Every Tuesday, 18:00-21:00 h, starting from 22.02.2011 at FMI, lab 101 (Sofia, James Baucher 5 -http://goo.gl/maps/MnXR)
  • Every Wednesday, 18:00 – 21:00 h, starting from 16.02.2011 at Telerik Academy’s training lab (Sofia, Mladost-1, bul. Alexander Malinov 33, ground floor – http://goo.gl/maps/mCZE)

Official Discussion Group

The official discussion group of the course is open for your questions, discussions and feedback: https://groups.google.com/group/qualitycodecourse.

Official Web Site

Visit the official Web site of the course for more information: http://codecourse.telerik.com/.

Registration for the Course

Please register for attending the course at: http://goo.gl/cFgv7.

Продължават Web Front-End курсовете

$
0
0

След успешното начало продължават безплатните уеб front-end обучения в Академията на Телерик.

Front-end-course-Telerik-15-March-2011-right-side

И трите учебни групи са напълно запълнени и общо около 180 души присъстват на обученията на живо. Останалите около 220 участници посещават курса онлайн. За повече информация следете сайта на курса: http://frontendcourse.telerik.com.

300 младежи ще се обучават безплатно за софуерни инженери в Академията на Телерик

$
0
0

Become .NET Ninja for FreeЗа трета поредна година Академията на Телерик за софтуерни инженери обявява своята програма за безплатно обучение и работа за .NET софтуерни инженери (.NET software engineers), инженери по качеството (QA and test automation engineers) и инженери по поддръжката за разработчици (developer support). Програмата има за цел да обучи безплатно на практическо програмиране, софтуерно инженерство и софтуерни технологии мотивирани млади хора, които да започнат успешно своята кариера в областта на разработката на софтуер.

Нов сезон на програмата “Telerik Software Academy”

Новият сезон на програмата “Telerik Software Academy” (2011-2012) ще започне в края на октомври 2011 г. с нови 300 участника (10 групи по 30 души, присъствено). Учебните занятия ще се проведат в учебните зали на Телерик в София. Успешно завършилите ще получат възможност за работа в световноизвестната българска фирма Telerik Corp. (работодател #1 на България за 2010 г.) при изключително атракивни условия.

Етапи на безплатното обучение

Безплатното обучение по програмата “Telerik Academy for Software Engineers” се състои от поредица от курсове (4 нива). Концепцията на тази уникална програма за безплатно обучение и старт в кариерата е “най-старателните успяват”. В края на всяко ниво от обучението участниците държат практически изпит по програмиране върху изучавания материал и в следващата част продължават само част от участниците – постигналите най-добри резултати. Всеки участник преминал успешно първите 3 нива от обучението избира между 3 специалности за последното ниво:

  • .NET Software Engineer
  • QA and Test Automation Engineer
  • Developer Support

Класирането за всяка от специалностите става по успех, както в университетите. В първите 3 нива обучението е напълно доброволно, безплатно и без ангажименти – се изисква подписване на договор и няма обвързване за продължаване в следващите нива. При началото на последното ниво на обучение участниците подписват договор, с който се съгласяват, ако завършат успешно и бъдат поканени, да се присъединят към екипа на Телерик за не по-малко от 2 години.

Първо ниво: курс C# Fundamentals – част I

Първото ниво на Академията започва с 300 души в курса “C# Programming Fundamentals – част I). Този курс е за абсолютно начинаещи и обхваща най-базовите основи на компютърното програмиране, които се изучават в средните училища: езикът C#, променливи, данни, оператори, конструкции за управление, условни конструкции и цикли. Към курса е разработена безплатна книга-учебник “Въведение в програмирането със C#”, безплатни уроци по програмиране, видеоуроци, задачи и решения към тях.

В края на курса участниците полагат практически изпит върху изучавания материал и най-добре представилите се 150 продължават в следващото ниво. Първото ниво ще започне през октомври 2011 г. и ще продължи около месец и ще се провежда 2 пъти седмично по 4 часа.

Можете да разгледате учебната програма лекциите и да гледате видеозаписи от курса C# Fundamentals от неговия уеб сайт: http://csharpfundamentals.telerik.com.

Второ ниво: курс C# Fundamentals – част II

Второто ниво на програмата “Академия за софтуерни инженери” продължава с малко по-сложни концепции от основите на компютърното програмиране: масиви, бройни системи, методи, рекурсия, използване на обекти, управление на изключенията, обработка на текст и символни низове, дефиниране на класове и работа с текстови файлове. Обучението продължават около 1 месец, два пъти седмично по 4 часа.

Обученията във второто ниво на Академията за софтуерни инженери завършват с изпит по практическо програмиране върху изучавания материал. В следващото ниво продължават най-добре представилите се 90 участници.

Трето ниво: курс C# Fundamentals – част III

Третото ниво на програмата за безплатно обучение и работа за софтуерни инженери обхваща значително по-сложни концепции от програмирането като фундаментални структури от данни (списъци, опашка, стек, дървета, хеш-таблици и графи), алгоритми и сложност, качествен програмен код и изграждане на алгоритмично мислене и умения за ефективно решаване на задачи по програмиране. Обучението продължава 1 месец, по 2 пъти седмично по 4 часа (както предните две нива).

В края на третото ниво на програмата “Академия на Телерик за софтуерни инженери” участниците, които имат желание да продължат безплатното си обучение и да започнат след завършване работа в Телерик, кандидатстват за една от трите специалности в академията (.NET developer, QA engineer, developer support engineer). Обучението продължава в три паралелни групи по направления, а класирането се извършва по успех.

Очаква се по трите специалности на Академията да бъдат приети за обучение в четвъртото (последно ниво) съответно:

  • .NET Software Engineer – 20-30 участници
  • QA and Test Automation Engineer – 20-25 участници
  • Developer Support – 10-20 участници

В първите 3 нива обученията са без обвързване, без договори – свободни и безплатни. Приетите за обучение в последното ниво на Академията сключват договор за работа в Телерик след завършването си. Договорът ги задължават да посещават съвестно учебните занятия, да положат всички изпити и да се отнасят старателно към учебния процес, а след завършване, ако бъдат одобрени, да работят в Телерик поне 2 години при изключително добри условия и отлично заплащане (спомнете си, че Телерик е в челото на класацията на най-добрите работодатели в България вече няколко години подред).

Четвърто ниво: .NET / QA / Dev. Support

Последното ниво на обученията в Академията за софтуерни инженери е най-сериозно, задълбочено и продължително. В засисимост от специалността безплатното обучение продължава още от 2 до 5 месеца, но вече целодневно. Обхватът на специализираните обучения е много голям, тъй като дава професия “софтуерен инженер” и работа в престижна световна софтуерна фирма. В Телерик работят изключителни професионалисти и изискванията за постъпване в компанията са много високи. За пълно овладяване на съвременните софтуерни технологии е необходима продължителна практика и създаване на трудови навици и в Академията на Телерик ще ги усвоите и натрупате (ако достигнете до последното ниво).

Курс .NET Essentials

Курсът .NET Development Essentials подготвя професионалисти за работа като софтуерни инженери с .NET платформата. Курсът продължава около 5 месеца, целодневно и обхваща всички по-важни софтуерни технологии, които един .NET програмист трябва да владее, за да е добър в професията си: от основните APIs на .NET Framework, unit testing, бази данни, SQL, SQL Server, ADO.NET, LINQ, ORM технологии, Entity Framework, Web front-end технологии, HTML, CSS, JavaScript, HTML5, ASP.NET, ASP.NET MVC, Windows Presentation Foundation (WPF), Silverlight, уеб услуги, WCF, софтуерни инженерство, работа в екип, сорс контрол хранилища, SCRUM и много други.

Курс QA and Test Automation

Курсът Software Quality Assurance and Test Automation подготвя инженери по управление и осигуряване на качеството. В него се получават задълбочени практически умения за осигуряването на качеството на софтуера и автоматизирано тестване. Основната му цел е да запознае курсистите с най-важното от QA инженерството, като се фокусира върху примери от практиката. Курсът покрива разнообразие от теми като: тестване на жизнения цикъл на приложенията, автоматизирано тестване, white-box и black-box техники за тестване, уеб и десктоп тестване, управление на тестове и редица инструменти за тестване, които улесняват работния процес чрез автоматизация на тестването.

Курс Developer Support

Обучението по направление за инженери по поддръжка на разработчиците, използващи продуктите на Телерик се провежда в курса “.NET Development Support”. Той обхваща както технологични компетенции, застъпени широко в курса “.NET Essentials”, така и методологически компетенции и умения за работа с клиенти, soft skills, умения за писане, умения за разрешаване на инциденти, за описание на инциденти и решения, изготвяне на документация и други.

Инструктори

Програмата “Софтуерна академия на Телерик” се ръководи лично от д-р Светлин Наков, който преподава на всички участници в курсовете. Телерик разполага с две учебни зали в София (Младост 1) съответно с капацитет 70 и 120 места. Преподавателският екип включва опитни специалисти от Телерик, бивши шампиони от националните олимпиади по програмиране и информационни технологии, с отлична подготовка и лекторски умения.

Кандидатстване за академията на Телерик

За да кандидатствате за безплатнитe обучения по програмата “Telerik Software Academy” е необходимо да изпратите актуално CV на английски език и мотивационно писмо до academy@telerik.com не-по късно от 16 октомври 2011 г.

Изисквания към кандидатите

Изисквания за участие в безплатните обучения по програма “Telerik Software Academy”

  • Силна мотивация за професионално развитие като софтуерен инженер
  • Стремеж за развитие в дългосрочен план и отдаденост на професията и работата
  • Технически английски език и отлично владеене на български език
  • Компютърна грамотност
  • Възможност и желание за работа на пълен работен ден след завършване (8 часа на ден)

Не се изискват каквито и да са умения по програмиране. Курсовете са подходящи за напълно начинаещи, стига да са запалени по компютрите.

Приемни изпити

Приемният изпит е под формата на 3 теста:

  • Английски език – тест

  • Тест за интелигентност (IQ тест)

  • Компютърна грамотност – тест

За повече информация около изпита, кандидатстването и приемните изпити посетете официалния сайт на Академията: http://www.telerik.com/academy/join.aspx.

Ако имате въпроси, пишете на academy@telerik.com – отговаряме в рамките на 1 работен ден.

Още от академията на Телерик

Ако езикът C# не ви допада или все още нямате желание или възможност да участвате в програмата “Софтуерна академия на Телерик” (все пак тя отнема от 5 до 10 месеца), ви предлагаме няколко безплатни курса по горещи съвременни софтуерни технологии, които можете да посещавате на живо или да запишете онлайн като дистанционно обучение:

Всички курсове в Академията на Телерик са безплатни! Към тях сме публикували за безплатно изтегляне лекции, уроци, учебни материали, видеолекции (видеоуроци), задачи и примерни проекти.

В курсовете могат да участват всички: ученици, студенти, работещи, безработни, учители, преподаватели и всички други с интереси към съвременните технологии за разработка на софтуер. Станете програмист / софтуерен инженер / софтуерен разработчик безплатно!

Завършилите с отличие безплатните обучения на Светлин Наков и Телерик получават сертификати и препоръка за започване на работа в индустрията.

Успехи на всички!

Нов безплатен курс по уеб дизайн с HTML 5, CSS и JavaScript –от март в академията на Телерик

$
0
0

безплатен курс по уеб дизайн, HTML и CSS

От март 2012 г. започва нов безплатен курс за изграждане на уеб сайтове с Photoshop, HTML 5, CSS 3, JavaScript и CMS системи. Курсът е подходящ както за абсолютно начинаещи, така и за хора с опит с уеб технологиите.

В безплатния HTML курс по разработка на уеб сайтове ще се запознаете със съвременните уеб технологии и ще натрупате практически умения за правене на уеб сайтове: от рисуването на сайта с Photoshop или друг графичен редактор, през нарязването на сайта до HTML 5, CSS 3 и JavaScript и интегрирането му в система за управление на уеб съдържание (CMS система).

Курсът по уеб дизайн и изработка на уеб сайтове е напълно безплатен, без договори и ангажименти. Всеки може да участва присъствено или дистанционно (онлайн). Всички учебни занятия ще се записват на видео и ще са достъпни от сайта на курса безплатно.

Какво ще научим от HTML курса?

От безплатния курс по уеб дизайн с HTML и изработка на уеб сайтове ще научите:

  • Как да работите с Photoshop и да рисувате уеб сайтове
  • Как да пишете HTML и CSS
  • Как работят уеб технологиите: WWW, HTTP, HTML, JavaScript, уеб сървъри и браузъри
  • Как да режете уеб сайтове (slice and dice): oт Photoshop към HTML + CSS + JavaScript
  • Как да работите с популярни CMS системи: WordPress, Joomla, Drupal, Sitefinity
  • Как да вкарвате нарязан уеб дизайн в CMS система
  • Как да раздвижвате уеб сайтовете с JavaScript, jQuery и AJAX
  • Как да качвате уеб сайт в Интернет (домейни, хостинги, настройки)

Кога и къде се провежда HTML 5 курса?

учебна зала - Телерик академияБезплатните уроци по уеб дизайн с HTML 5 се провеждат в софтуерната академия на Телерик (София, ж.к. Младост-1, бул. Александър Малинов 31, етаж 2, сватбен мол). Залата е модерна, с капацитет 250 места (вж. снимки на учебната зала).

Учебната зала се намира се на 5 минути от метростанция “Младост” и до нея има удобен градски транспорт.

Учебните занятия от курса по уеб дизайн се провеждат два пъти седмично:

  • вторник от 19:00 до 22:00 часа
  • четвъртък от 19:00 до 22:00 часа

Начало на HTML курса (първа сбирка):

  • 13 март 2012 г. от 19:00 часа

Учебна програма на безплатния HTML курс

  1. Преглед на курса по уеб дизайн и HTML

    Откриване на курса “Уеб дизайн с HTML 5, CSS 3 и JavaScript”. Представяне на лекторския екип, учебния материал, изпитване, домашни, проекти, сертифициране

  2. Основи на уеб програмирането

    HTTP протокол, WWW, request-response модел, GET, POST, HTTP статус кодове, cookies, Firebug и други инструменти за уеб разработка

  3. Основи на езика HTML (част I)

    HTML, синтаксис, тагове и атрибути, текст, изображения, хиперлинк, форматиращи тагове, параграфи, списъци

  4. Основи на езика HTML (част II)

    HTML таблици, форми и контроли (текст, падащ списък, текстова област, контроли за избор, бутони и други), рамки (frames, iframe), GET и POST

  5. Основи на HTML 5

    HTML 5, структурни тагове, семантичен HTML, форми, валидация на полета, нови атрибути, HTML 5 canvas

  6. Стилизиране със CSS (част I)

    Създаване и използване на CSS стилове, селектори, стилови дефиниции, шрифтове, фонове, рамки, box-model, подравняване (alignment)

  7. Стилизиране със CSS (част II)

    Позициониране (абсолютно и плаващо), margins, paddings, z-index, видимост, скролиране, плаване (floating), дизайн в няколко колони

  8. CSS 3

    Нови селектори в CSS 3, шрифтове, сенки, заоблени ъгли

  9. Photoshop

    Photoshop, обработка на изображения, групи, слоеве, селекции, трансформации, цветове, ефекти, създаване и експорт на изображения

  10. Изграждане на уеб сайтове с HTML и CSS

    Рязане на уеб сайт: преобразуване от PSD изображение към HTML 5 и CSS 3, multi-column layout, floating DIVs, уеб сайтове с фреймове, уеб сайтове с таблици, уеб сайтове с DIV-ве

  11. Основи на JavaScript

    Работа с JavaScript, прихващане на събития (onцlick, onмouseоver и т.н.), DHTML, JavaScript синтаксис, типове данни, оператори, условни конструкции, цикли, масиви, диалози, достъп до DOM дървото с JavaScript, дебъгване на JavaScript код

  12. HTML 5 и новите му JavaScript APIs

    HTML 5 JavaScript APIs, нови селектори, създаване на canvas изображение с JavaScript, асинхронна работа с нишки в JavaScript, drag и drop, съхранение на дани с HTML5, разширения на HTML DOM дървото

  13. CMS системи и WordPress

    Преглед на системите за управление на съдържание (CMS), работа с WordPress (инсталиране, настройване, административен интерфейс, страници, постове, категории, тагове, коментари, настройки, теми, добавки), създаване на WordPress теми

  14. Инсталация на CMS системи (WordPress)

    Свързаване на хостинг с домейн, инсталация на WordPress на хостинг, качване на WordPress тема

  15. CMS система Joomla

    Инсталация и конфигурация на Joomla, модули, страници, новини, шаблони, създаване на прост сайт, вкарване на нарязан уеб дизайн в Joomla

  16. CMS система Drupal

    Инсталация и конфигурация на Drupal, модули, страници, новини, шаблони, създаване на прост сайт, вкарване на нарязан уеб дизайн в Drupal

  17. CMS система Sitefinity

    Инсталация и конфигурация на Sitefinity, модули, страници, новини, шаблони, създаване на прост сайт, вкарване на нарязан уеб дизайн в Sitefinity

  18. Практически проект: рязане на сайт и вкарване в CMS система

    Рязане на уеб дизайн: от Photoshop дизайн към HTML + CSS + images + JavaScript. Интегриране на уеб дизайн в CMS система.

  19. Техники за напреднали

    Кеширане при клиента, решаване на проблеми с различните браузъри, client-side performance tuning, оптимизация за търсещите машини (SEO), достъпност, Sprites

  20. JavaScript обектно-ориентирано програмиране

    Prototype модел, наследяване, свойства (properties), методи, публични и скрити членове

  21. JavaScript библиотеки

    JavaScript библиотеки (JS frameworks): Prototype, jQuery, MooTools, Dojo, YUI, KendoUI

  22. Основи на jQuery

    Въведение в jQuery, jQuery селектори и манипулация на DOM дървото, jQuery събития и прихващане, AJAX заявки, jQuery темплейти, jQuery UI, ефекти и взаимодействия

  23. Достъп до външни данни

    Достъп до външни данни и услуги чрез jQuery и AJAX, работа със REST и JSON, работа с библиотеки, предоставени от Twitter, Facebook, Google и т.н.

  24. JavaScript библиотеки за изграждане на потребителски интерфейс

    KendoUI, YUI, KendoMobile, jQuery Mobile

  25. Responsive design

    Media queries, динамични изображения, еластичен грид

  26. Демонстрация за създаване на JavaScript фронт-енд приложения

    Създаване на клиентски JavaScript приложения с HTML 5, CSS, JavaScript, jQuery и AJAX

  27. Практически проект: JavaScript клиентско приложение

    Създаване на уеб приложения с DHTML, CSS 3, HTML 5, SVG, JavaScript, jQuery и AJAX, Пример: уеб чат приложение с потребители, чат стаи и т.н.

Домашни в HTML курса

Участниците в курса ще имат упражнения по всяка от изучаваните теми от учебния план, които да разработят в клас или като домашни. Домашните са част от оценяването в курса и са необходима предпоставка за успешно завършване и сертификация.

Практически проекти по правене на уеб сайтове и програмиране на JavaScript

За завършване на курса по уеб дизайн и клиентско програмиране е необходимо всеки курсист да разработи и защити два курсови проекта:

  • Първи проект: рязане на уеб сайт (от Photoshop към HTML 5 и CSS 3) и вкарване на сайта в CMS система(WordPress, Joomla, Drupal или Sitefinity)
  • Втори проект: клиентско JavaScript приложение с AJAX и REST услуги

Курсовите проекти се разработват вкъщи и се защитават присъствено пред комисия, съставена от преподаватеслкия състав.

Присъствено и онлайн участие в HTML курса

За удобство на курсистите са предвидени две форми на участие в HTML курса:

  • дистанционно обучениеПрисъствено – участниците, записали се за присъствено обучение, идват на учебните занятия в голямата учебна зала на софтуерната академия на Телерик и участват на живо обученията по уеб дизайн и програмиране на уеб сайтове.
  • Онлайн (дистанционно обучение) – участниците в HTML курса, записали се за дистанционно обучение, гледат видеозаписи от учебните занятие (видео-уроци) и работят вкъщи (отдалечено), без да идат физически на учебните занятия.

Всички участници в курса по уеб дизайн, изработка на уеб сайтове и JavaScript програмиране предават своите домашни по Интернет след всеки урок и накрая защитават присъствено своите практически проекти.

Сертификати и награди за шампионите

сертификатУчастниците в курса по уеб дизайн и сайтаджийство, които са предали всичките си домашни и са разработили и защитили отлични курсови проекти, получават сертификати и предложения за работа от софтуерни фирми (ако са изявили желание).

Как да се запиша за курса по уеб дизайн?

За безплатно участие в курса по уеб дизайн и правенене на уеб сайтове (сайтаджийство) може да се запишете като се регистрирате на сайта на HTML курса и посочите формата на обучение (присъствено или дистанционно). Срок за записване: до 13 март 2012.

10+ High-Quality Free WordPress Themes

$
0
0

High-quality free WordPress themesI often create simple Web sites and in most cases I use WordPress as a CMS (content management system). If the customer does not need something very special and unique, I prefer to use proven free WordPress themes or paid themes from Theme Forest (if I have non-zero budget). This works well for small Web sites, saves time and money, makes the customers happy and the support later is straightforward. WordPress does its job well. It is great for building small Web sites and blogs and it is SEO-friendly (after very few customizations) and has a lot of plugins and extensions, including reliable spam protection (thanks to Akismet).

Free WordPress Themes?

Finding a high-quality WordPress theme with a modern Web design, HTML5, customizable, without major bugs and well working is not so easy like many may initially assume. The are thousands free WordPress themes at WordPess.org themes directory but to be honest 99% of them are bull shit.

Collecting High-Quality Free WordPress Themes

I have a nice habit: collecting good free WordPress themes. In my daily work if occasionally I some Web site with a good WordPress theme catches my eyes, I check its and its theme. If the site is WordPress based and it theme is free, I collect the theme name and its download URL. I do this because due to marketing, spam and SEO, it is hard to find really free and really high-quality WordPress themes on the Web. Most sites advertise a theme as free and high-quality, but the reality is different.

How Do I Check If Certain WordPress Theme is Free?

Just click [Ctrl+U] (view page source) and then [Ctrl+F] (find text) an search for “wp-content/themes” or just “themes/”, then see the name of the theme, e.g. “snowblind”. Once you know the theme name, find the theme site in Google (e.g. search for “snowblind theme wordpress”). At the theme Web site check whether it is free and optionally try to download, install and test it.

High-Quality Free WordPress Themes – My Favorites

After few months I came to the following 10 free high-quality WordPress themes which are my favorites:

New nice free WordPress themes I found after the original publication of this blog post

Happy wordpressing … and if you need some day a really good free WordPress theme, check the list above. Also feels free to share your favorites in the comments below.

Свободен софтуерен университет –концепция и напредък по проекта (@ OpenFest 2012)

$
0
0

Актуално: Софтуерният университет е вече факт. Научете повече от неговия официален уеб сайт:

Софтуерен университет – http://softuni.bg


Software-University-Logo-blue-horizontal.png


От години работя по изграждането на истинско образование за софтуерни инженери в България. От момента в който станах студент в първи курс, разбрах, че държавното образование има нужда от драматична корекция, за да съответства на реалността, на индустрията, на пазара на труда, на икономиката, и че тази корекция няма да се случи от само себе си.

Правил съм много опити частично да реша проблема с образованието на софтуерните специалисти в България: водих изборни курсове по програмиране и разработка на софтуер във ФМИ на СУ, в ТУ-София, в НБУ, създадох с колеги собствена академия по разработка на софтуер (НАРС), а след това и софтуерната академия на Телерик – най-големия център за алтернативно образование за софтуерната индустрия. Към момента (ноември 2012) в академията се обучават около 4000 души, от които 1000 присъствено.

Лека полека дойде време за нещо по-голямо и по-значимо за образованието в България: изграждането на софтуерен университет – място където млади хора да участ безплатно съвременните концепции за разработка на софтуер, съвременните софтуерни технологии и практиката на професията “софтуерен инженер”. Боря се да изградя качествено обучение, безплатно, което дава професия и работа в софтуерната индустрия и диплома за висше образование. Ужасно трудно е, но това не ме спира – нито мен, нито моя, екип, приятели и съмишленици. До къде сме стигнали, какви трудности срещаме и кога ще заработи софтуерният университет споделям в презентацията за свободно обучение на софтуерни инженери на OpenFest 2012:

Видео от лекцията за свободния софтуерен университет

Книгата “Програмиране = ++Алгоритми;”достъпна за безплатно изтегляне в PDF формат

$
0
0

За любителите на алгоритмите и програмирането имаме прекрасна новина. Една от най-известните книги за алгоритми, структури от данни и състезателно програмиране в България “Програмиране=++Алгоритми;” е вече достъпна за безплатно изтегляне в PDF формат.

Книга "Програмиране=++Алгоритми" от Наков и Добриков

Изтеглете безплатно книгата “Програмиране = ++ Алгорими;” на Преслав Наков и Панайот Добриков

Книгата се препоръчва за начинаещи и напреднали в състезателното програмиране и за всички любители на алгоритмите, състезанията по информатика и алгоритмичното мислене.

Щастлив съм, че спомогнах да убедим авторите на книгата (брат ми Преслав Наков и колегата Панайот Добриков) да я пуснат безплатно като PDF за доброто на младите в България (ученици, студенти, учащи и работещи) и за развитието на състезателното програмиране и на общността на занимаващите се с програмиране като цяло. Това не означава, че хартиената версия ще изчезне от книжния пазар, но книгата като цяло ще стане по-достъпна за всички, които се интересуват от програмиане, алгоритми и структури от данни и състезания по програмиране.

Книгата се препоръчва и като допълнително помагало към курса по алгоритми в Софтуерната академия на Телерик.


New Free Courses for Developers at Telerik Software Academy (August / September 2013)

$
0
0

With the autumn at the corner, we at Telerik Software Academy think it is time to make a fresh start and undertake an adventure. Telerik Academy is rolling out a set of exciting, brand new free courses that will rock your world. From developing slick mobile apps for Windows 8, to understanding the key concepts of user experience design or mastering PHP web development – you decide which courses to dive into.

Telerik Software Academy - free training courses for developers

5 New Free Courses at Telerik Academy (Fall 2013)

Windows 8 Store Applications with HTML, CSS and JavaScript

August 19, 2013 – Ultimate Training Hall

Are you eager to develop beautiful and powerful mobile applications for the Windows Store? Join our course “Windows 8 Store Applications with HTML, CSS and JavaScript” and learn how to build Windows 8 apps from the ground up, using HTML, CSS and JavaScript. Within this course you will become familiar with the Windows 8 app framework and the JavaScript library – WinJS. You will learn how to access your data remotely, use push notifications and create a user friendly design for your app. In just two weeks you will have the skills to build a complete and running mobile application ready for the Windows store.

Training Program for the WinJS Free Course

  • Windows 8 & Store Apps
  • Introduction to WinJS
  • WinJS Controls
  • Asynchronous Programming in WinJS
  • Accessing the File System
  • Application Lifecycle for Win Store Apps
  • Data binding in WinJS
  • Implementing Contracts
  • Design Guidelines for Windows 8 Apps
  • Push Notifications and Windows Push Notification Service (WNS)
  • Building a Windows Store App with HTML, CSS and JavaScript
  • Publishing Apps in Windows Store

The two-week free Win8 Development course starts on August 21, 2013 and will be held every workday from 10:30 till 16:00.

JavaScript Frameworks

August 21, 2013 – Enterprise Training Hall

This two-week intensive course covers the most commonly used libraries that shorten the development process of JavaScript applications. Participants will learn how to create Single Page Applications from scratch, using JavaScript Frameworks and will become acquainted with Telerik Kendo UI. Divided into teams, all students will have to develop a RESTful API and a Single Page Application with Kendo UI as a final course project.

Training Program for the JS Frameworks Free Course

  • JavaScript Design Patterns
  • Single Page Application (SPA) Architectures
  • Modernizr
  • Mustache.js
  • Sammy.js
  • Underscore.js and lo-dash
  • RequireJS
  • MVC and MVVM Design Paradigms
  • AngularJS
  • Telerik Kendo UI
  • Telerik Kendo Mobile
  • TDD with QUnit
  • Practical Project: Building Single Page App in JS

Everyone, willing to take part is welcome to join our free JS Frameworks classes – Monday to Friday, every day from 10:30 till 16:00, starting from August 21, 2013.

PHP Web Development

September 4, 2013 – Ultimate Training Hall

If mastering a new programming language is part of your New Year’s resolution, we have the perfect course for you – “PHP Web Development”. This course will be held every Wednesday from 19:00 by an external trainer, Ivan Vankov (gatakka), a famous blogger, proficient software developer and exceptional lecturer. While beginning with some programming basics like loops, functions and HTML, the course is mostly practice oriented and covers more advanced topics like databases, PHP exceptions, namespaces, traits, information security and MVC.

Training Program for the PHP Free Course

  • PHP Basics. Loops. Functions
  • PHP and HTML. Working with HTTP
  • Practical Project: PHP, HTTP and HTML
  • Accessing the File System. Sessions
  • Accessing Databases. Working with MySQL
  • The PHP Object Model. Classes, Objects, Inheritance. Exceptions
  • Namespaces. Traits
  • Practical Project: Object-Oriented Programming with PHP
  • Security in Web Applications and PHP
  • MVC Frameworks for PHP

The free PHP course starts Wednesday, September 4, 2013.

UX Design

September 3, 2013 – Ultimate Training Hall

Telerik’s UX and interaction design experts will guide Telerik Academy’s students through the main processes, instruments and methodologies of creating great user experience. This course is ideal for both software engineers and non-tech experts who want to gain valuable design knowledge and experience. Participants will learn the most important elements of user experience – lean design, graphic design fundamentals, interaction and UI design.  Learn how to go beyond building features and writing content, and start thinking of usability and engagement.

Training Program for the UX Design Free Course

  • Lean UX
  • Graphics Design Basics
  • Information Architecture
  • Interaction Design
  • UI Design

Beginning on September 3, 2013, the free UX Design course will be held 5 consecutive Tuesdays from 18:00 till 20:00.

Healthy Living

September 12, 2013 – Ultimate Training Hall

The key to a healthy living lies in the better work-life balance. We can feel more energetic and happy and at the same time increase our productivity and concentration, by simply combining work with sports, healthy food and social activities. Fine Line’s healthy lifestyle experts will share the secret how to establish long-term habits for e better life. The main topics within the course are: healthy food that must always be on your menu, techniques to stay active during the whole day, ideas to improve our communication skills and keep a work-life balance.

Training Program for the Healthy Living Free Course

  • Healthy Living – Freedom or Slavery? What is “Holistic Approach” and Why We Don’t Love “Diets”?
  • We Are What We Eat. Importance of Food and Nutrition. Superfoods for Super People
  • How to Keep the Tonus and Concentration at the Computer for Hours
  • Techniques for Efficient Communication in the Office
  • How to Combine Intensive Work with a Healthy Life?
  • Functional Training (Additional Meeting)

Join the Fine Line’s free trainings on healthy living, together with our students from Telerik Software Academy, every Thursday from 18:30, starting at September 12, 2013.

Fundamentals of Programming with C#: Free Book, Videos, Presentations and Mind Maps

$
0
0

C# Programming Fundamentals Book (by Svetlin Nakov & Co.)After years of hard work  the free book “Fundamentals of Computer Programming with C#” was finally published (in September 2013). The free C# book comes with free video lessons, presentation slides, mind maps, exercises, guidelines and exercise solutions to help learners to study the foundations of computer programming and trainers to teach newbies in programming, C#, data structures, algorithms, logical thinking and problem solving.

It was amazing project accomplished by my team of 80+ volunteer contributors (authors, editors, translators and many others). The book was originally written in Bulgarian language and based on the Java platform, later translated to C# and improved and finally translated to English.

C# Book – Free Programming Tutorial (Book + Videos)

The free C# programming book consists of 1122 pages: from basic concepts like variables, expressions, statements and loops to advanced topics like recursive algorithms, hash-tables, balanced trees and high-quality code.

The free book “Fundamentals of Computer Programming with C#” (http://www.introprogramming.info) is a comprehensive computer programming tutorial that teaches programming, logical thinking, data structures and algorithms, practical problem solving and high-quality code construction with many examples in C#, exercise assignments and solution guidelines.

The C# book comes with free video lessons, presentations, mind maps, practical exercises and solutions. Learn programming by watching video lessons and practicing computer programming. This is an efficient  modern approach to start learning software development.

Comprehensive Programming e-Book for Beginners, Intermediates and Experienced Developers

Intro C# Book by Nakov - free programming book, videos and slidesThis free book on fundamentals of programming teaches the major programming concepts and way of thinking needed to become a skillful software engineer and the C# language in the meantime. It is a strong start for anyone who wants to become a great developer. It teaches not just the programming language syntax, but how to design algorithms and solve practical problems.

The free programming book is good for beginners and intermediate-level developers who want to put a solid base for a successful career in the software engineering industry. Even experienced developers could fill their gaps in the fundamentals of programming, data structures, algorithms and high-quality code design.

Free C# Programming Book – Read Online

The free book on programming fundamentals (the Bulgarian C# book) covers the basic concepts of programming, the C# language, Visual Studio and basic APIs of the .NET Framework, object-oriented programming principles (OOP), as well as advanced topics like hash-tables, graphs and recursion.

The free programming book consists of 26 chapters for beginners, intermediate programmers and experts. Read online the free computer programming book by Svetlin Nakov and his team:

Read the free programming fundamentals book here: http://www.introprogramming.info/english-intro-csharp-book/read-online/. We are a non-commercial team, so no registration is required. Just read the C# book for free.

C# Videos – Free Programming Video Tutorial

The free programming fundamentals book is accompanied by 27 free video lessons on C# programming (42 hours), free C# presentation slides (27 PPTX presentations) and mind maps, as well as hundreds of exercises with solutions and live examples.

Free CSharp Programming Video Lessons

The free C# programming videos are a comprehensive video course on computer programming fundamentals and C# programming. Sites like PluralSight and Linda.com provide paid C# video lessons. Why not learn C# and programming concepts for free? Just try. No registration, no email, nothing is required. We operate under a non-commercial project and thus every resource we build is free.

Technologies Covered in the C# Book

Intro C# Book - 3D CoverThe main book intent is to teach concept, not technologies. We teach you to think like a developer, to solve problems, to construct algorithms, to write solid code, to test efficiently, to think about the performance, choose the right data structures and algorithms, use the object-oriented principles correctly, to write high-quality classes and methods, use exception handling correctly, to process string text efficiently, to use recursion correctly, to use advanced data structures like self-balancing search trees, hash-tables and graphs to solve complex real-world problems, etc.

The books does not teach technologies like databases, web development, mobile applications and cloud computing but it reveals the true way to master the basics of programming regardless of the languages, technologies and tools. technologies change every day but the fundamental concepts of computer programming are nearly the same for the last 15 years. This book focus on these fundamentals: the core of computer programming which is a foundation for all software technologies, frameworks, languages and tools. Once you learn programming though this free C# book and video lessons, you can easily switch to other languages like Java, PHP, JavaScript, Python or Ruby. The important thing is to learn the way of thinking, problem solving approach and programming concepts. The rest is just a tool which changes over the time – languages, technologies, tools, etc.

C# Presentation Slides – Free C# Resources for Trainers

Free C# programming teaching resources by Svetlin NakovIf you are a trainer, speaker, university professor, school teacher or just a person who wants to teach others how to program, you have a great free resources to provide programming and C# lessons. The entire book content is presented in condensed form as free presentation slides (in PowerPoint format) and homework exercises ready-to-use by any trainer (non-commercially).

We provide for free, under the Creative Commons Open-Source License (CC-Attribution-NonCommercial-ShareAlike) all our C# programming presentation slides (PPTX presentations) + live demos, exercises and solution guidelines + reference videos.

Svetlin Nakov and other trainers teach C# and programming fundamentals for many years in his courses in Sofia University, Technical University of Sofia, New Bulgarian University, National Academy for Software Development, Telerik Software Academy and Software University, using the C# programming book and especially the presentation slides and live demos coming with the free C# book. Over 5000 students have passed live programming training  (as of January 2014) using our C# programming trainer’s resources (C# slides, C# live demos, C# book and others).

C# Source Code Examples

The book is accompanied by free C# source code examples for each book chapter, ready to be opened in Visual Studio to simplify playing with the code. You may experiment how the code works, modify and play with it. It is highly recommended that you run the sample code while reading the book chapters and play with the code: try changing the code, try extending it, try breaking it, even rewriting it in a new fashion.

A piece of C# source code in Visual Studio

The source code examples illustrate the book content in practice. Most of the sample code comes with live video demonstration as part of our free C# programming video lessons distributed with the book.

Mind Maps of the Book and the Free C# Lessons

Do you use mind mapping? Mind maps are tools to improve your memory and learning by using diagrams to visually represent the most important information by using words with associations and images. To improve your learning process a team of volunteers created an interactive mind map on the C# programming fundamentals book that represents the entire book with ability to drill-down into its chapters and zoom-in / zoom-out over the information and its associations:

C# programming mind maps

You can read the book or watch the free video lessons and revise what you have learned from time to time through these mind maps and this will ensure better understanding, better memorization and more efficient learning process. Just try the C# book mind maps, it is free.

The Free C# Programming e-Book Comes in PDF, ePub, Kindle, DOC, DOCX, HTML and Other eBook Formats

The free book on fundamentals of computer programming and C# comes free in many modern e-book formats. The book was originally written in MS Word (in DOCX format). Later it was exported as PDF, which is the recommended format that opens on all modern large screens devices. Additionally the book was published as HTML to allow publishing it on the book’s official web site: http://www.introprogramming.info/english-intro-csharp-book/read-online/.

The free C# book in many ebook formats (PDF, DOCX, ePub, mobi)

A real challenge was to export the book in high-quality e-book formats like ePub and Mobi (Kindle). The high-quality export was done the following way: first the ePub format was exported from MS Word using Calibre. Then the epub file was manually edited and significantly improved in Sigil. The HTML and CSS behind the ePub archive was converted to modern HTML5 responsive layout and now the C# book epub opens correctly and with good quality at any screen resolution (from 320 x 200 to very large screens) in all modern e-book readers.

The Kindle version was really a pain. The mobi format used in Kindle devices is hard to be managed. As of October 2013 there is no mobi editor available anywhere. The book was converted from epub to mobi through Calibre and the results is acceptable quality Kindle ebook. Some tables, layout and source code are incorrectly formatted but this cannot be easily fixed. Sorry, Kindle readers, try the PDF version if your device can read PDF!

We highly recommend the PDF version of the free C# book because it is correctly formatted, opens everywhere and the links inside work correctly. The epub / mobi versions could display incorrectly portions of the text, images, tables and source code examples.

Download the free C# book in many formats from it web site: http://www.introprogramming.info/english-intro-csharp-book/downloads/.

C# Book Project Sponsors

The team behind this volunteer-driven open-course project wants to thank to the sponsors who helped this free C# book, video lessons and presentation slides to be published in English and distributed freely.

Initially Tеlеrik and Tеlеrik Sоftwаrе Аcаdеmу helped us with volunteers and internal resources, helped to attract authors and contributors and supported the publishing of the Bulgarian version of the C# book:

Tеlеrik Cоrp. Tеlеrik Sоftwаrе Аcаdеmу

Superhosting.BG provided a rock-solid hosting platform for our web site:

Superhosting.BG

The Bulgarian Association of Software Developers (BASD) provided resources and volunteers to help us with this open-source project with significant social impact over the software development community:

Bulgarian Association of Software Developers (BASD)

The Software University Foundation helped us building the interactive web site of the entire book family (the Intro C# English book, the Intro C# Bulgarian book and the Intro Java book):

Software University Foundation

Amazon Kindle bookstore: The C# Programming Fundamentals Book by Svetlin Nakov & Co.

The Bulgarian C# Book in Amazon, Google and Other Bookstores

After its publishing the free book on programming fundamentals with C# was shipped to the biggest bookstores across the world. Where possible, the book was offered as free download. Some bookstores work with paid books only so we uploaded the book as paid entry with the link for free download in its description:

C# Programming eBook Mobile Apps

C# Programming Fundamentals for Android AppWe even created an Android mobile application for the free C# programming book: C# Programming Book for Android.

The Android app is designed to easily locate the C# book assets:

  • Read the book online
  • Watch the C# programming videos online
  • See the PowerPoint C# slides for each book chapter
  • Browse the C# book mind maps
  • Download the C# book in many formats (ePub, PDF, DOCX, …)
  • View the Bulgarian C# and the Bulgarian Java books online
  • Learn more about the book and its accompanying resources

C# Programming Book: The Paperback Edition

The “Fundamentals of Computer Programming with C#” book (English version) has been published in hardware form (as paperback) under the ISBN numbers: 978-954-400-773-7 (9789544007737) and 954-400-773-3 (9544007733). The book is sold as paper-copy (paperback) in the publisher’s online store which ships internationally. The price of the paper copy of the C# book is 6.56 EUR. The shipping for Bulgaria is 2 EUR but international shipping is more expensive then the printed book itself.

CSharp-Book-Order-Now-Banner Intro-CSharp-Book-Nakov-Paperback-Copies CSharp-Book-Order-Now-Banner

The Team Behind the Free C# Book Project

The C# Fundamentals book was an amazing project done by amazing team! More than 80 people contributed to this open-source / open-knowledge project: to build a high-quality book for programming beginners that lays the foundation for becoming a skillful software engineer.

Originally the programming fundamentals book was written in the period 2008-2009 in Bulgarian for the Java language and platform. The original team of Java authors, editors and contributors was the following (in alphabetical order): Boris Valkov, Danail Aleksiev, Hristo Todorov, Lachezar Bozhkov, Luchesar Cekov, Marin Georgiev, Mario Peshev, Mariyan Nenchev, Mihail Stoynov, Nikolay Nedyalkov, Nikolay Vasilev, Petar Velev, Radoslav Ivanov, Rumyana Topalska, Stefan Staev, Svetlin Nakov, Teodor Stoev, Veselin Kolev, Vladimir Tsanev and Yosif Yosifov. The team was lead by Svetlin Nakov who managed to motivate all the contributors to write their chapter of the book and to catch up with the deadlines.

Later, in the period 2009-2011 the Java fundamentals book was translated to C# (in Bulgarian language). In fact it was not just a direct translation, but the book was significantly revised and improved during its adoption to the C# language, the .NET platform and the Visual Studio IDE, even new chapters were written. The team was lead by Svetlin Nakov and Veselin Kolev who both put a lot of effort to guide the process and retain the high-quality of the content. The Bulgarian C# book was published in June 2011. The team of the Bulgarian C# authors, editors and contributors to the Bulgarian C# book project was the following (in alphabetical order): Dilyan Dimitrov, Doncho Minkov, Hristo Germanov, Iliyan Murdanliev, Marin Georgiev, Mihail Stoynov, Mihail Valkov, Mira Bivas, Nikolay Kostov, Nikolay Nedyalkov, Nikolay Vassilev, Pavel Donchev, Pavlina Hadjieva, Radoslav Ivanov, Radoslav Kirilov, Radoslav Todorov, Stanislav Zlatinov, Stefan Staev, Svetlin Nakov, Teodor Bozhikov, Teodor Stoev, Tsvyatko Konov, Vesselin Georgiev, Veselin Kolev, Yordan Pavlov and Yosif Yosifov (partially shown on the image below):

C# book authors

The English translation of the Bulgarian C# book started in January 2012. The project was organized and the team was lead by Svetlin Nakov. The book was split into 42 pieces (chapters and parts of chapters) and each piece was assigned to a different volunteer translator (mostly students from Telerik Software Academy). Some translators were doing well their jobs and was awarded additional pieces of the book to translate. Finally each chapter was reviewed by a different team member to clean-up the translation mistakes and laxities. After that a long period of detailed review was passed to ensure the highest book quality. Many people were involved. Svetlin Nakov put enourmous effort to clean-up the translation style, the book content and formatting. He also reviewed a few chapters and improved their content, rewrote a few examples, fixed hundreds of bugs and updated the content to C# 4.0 and .NET 4.5 and Visual Studio 2012. Many other people helped the English C# book to be prepared with high quality and to clean-up translation bugs (George Georgiev, Ivaylo kenov, Ina Dobrilova Aneliya Stoyanova, Hristo Radkov, and others). The project of C# book translation from Bulgarian to English took the period from January 2012 to September 2013.

A lot of work was put to develop the web site for the C# / Java / BG / EN books. It was joint contribution of many people, mainly Viktor Ivanov and Peter Nikov under the guidance the main driver of the project Svetlin Nakov. A nice contribution to the C# English book site was the interactive mind map created by a large group of Telerik Academy students and by Vladi Stanev who coded the UI in JavaScript.

The full change logs of the C# book development (for the Bulgarian and the English version) are available at the C# book project repository at Google Code: https://code.google.com/p/introcsharpbook/source/list.

Big Thank to All C# / Java Free Programming Book Contributors!

Thank you my team by Nakov (the # book team lead)Dear colleagues, big thank you! It was amazing project and it became reality due to all of you, who voluntarily worked on these free C# and Java programming books, who didn’t sleep to do their job, to catch the deadline. Big thanks to all these contributors (given in alphabetical order): Alexandra Mileva, Alon Rotem, Aneliya Stoyanova, Angel Angelov, Atanas Valchev, Blagovest Buyukliev, Boris Valkov, Boyan Dimitrov, Danail Aleksiev, Dilyan Dimitrov, Dimitar Bonev, Doncho Minkov, Doroteya Agayna, Dyanko Petkov, Franz Fischbach, George Halachev, George K. Georgiev, George S. Georgiev, Georgi Mitev, Georgi Todorov, Georgi Vaklinov, Hristo Germanov, Hristo Radkov, Hristo Todorov, Iliyan Murdanliev, Ina Dobrolova, Ivan Nenchovski, Ivaylo Dyankov, Ivaylo Gergov, Ivaylo Kenov, Jasmina Stoyanova, Kristian Dimitrov, Kristina Nikolova, Lachezar Bozhkov, Lachezar Tsekov, Lora Borisova, Marin Georgiev, Mario Peshev, Mariyan Nenchev, Martin Gebov, Martin Radev, Martin Yankov, Mihail Stoynov, Mihail Valkov, Mira Bivas, Momchil Rogelov, Nedjaty Mehmed, Nencho Nenchev, Nikolay Angelov, Nikolay Kostov, Nikolay Nedyalkov, Nikolay Vassilev, Pavel Benov, Pavel Donchev, Pavlina Hadjieva, Petar Velev, Peter Nikov, Radoslav Ivanov, Radoslav Kirilov, Radoslav Todorov, Rumyana Topalska, Stanislav Vladimirov, Stanislav Zlatinov, Stefan Staev, Svetlin Nakov, Teodor Bozhikov, Teodor Rusev, Teodor Stoev, Tihomir Iliev, Todor Mitev, Tsvyatko Konov, Vasya Stankova, Ventsi Shterev, Vesselin Georgiev, Vesselin Kolev, Vesselina Raikova, Viktor Ivanov, Vladimir Amiorkov, Vladimir Stanev, Vladimir Tsanev, Vladislav Karamfilov, Yoan Krumov, Yordan Pavlov, Yosif Yosifov, Zhelyazko Dimitrov. You are a great team, a real heroes!

Project Roadmap: What Comes Later?

Project Roadmap: Free C# and Java Programming Fundamentals BooksNo one knows what comes later! I am tired of working on this family of programming books. It took 6 years of hard work to build the Bulgarian Intro Java book, the Bulgarian Intro C# book and the English Intro C# book. I learned a lot on how to lead teams of volunteers, how split the work between the team members and how to define scope and deadlines, how to manage the risks, how to fix wrong work and missed deadlines. It was a great experience to work with 80+ volunteers over the years. Than you!

Possible next steps for this project could be the following:

  • Update the free Java book to the latest Java version (it was written in 2008 for Java 5)
  • Translate the free Bulgarian Intro Java book into English
  • Write a C++ version of the programming fundamentals book
  • Split the book into smaller pieces (1200+ pages is too big, right?)
  • Record Java video lessons following the book (in Bulgarian and English) and Java PowerPoint slides

I cannot guarantee anything of the above will ever happen, but I hope to find an energy and good teams of volunteers to move these projects forward again and give more and more for the developer’s community.

The C# Book Fan Club

Become a fan of the free C# / Java programming fundamentals books and help us to promote these books, video lessons and other great resources for programmers-beginners throughout the world.

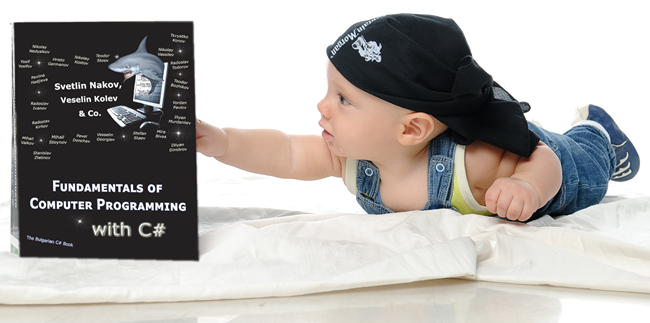
Little-Baby-Likes-the-CSharp-Book-Nakov-English

C# book social share boxLet’s share, promote and recommend the C# Fundamentals book:

  • Vote +1 in Google+ for the C# / Java fundamentals free books web site.
  • Share this publication in your Facebook / Twitter / Google+ profile.
  • Write a blog post about the free C# fundamentals book and videos in your blog. You may find images and informational texts in the book’s SVN repository here.
  • Write a book review in Amazon / Google Books / Goodreads, …
  • Recommend to your friends the C# book and videos.

You may find the social share / like buttons at the top right corner of the book’s site home page.

The official Facebook page for the free C# fundamentals book is located at: http://facebook.com/IntroCSharpBook.

Happy reading, video watching, problem solving and playing with C# and Visual Studio with the “Fundamentals fo Computer Programming with C#” book.

Become a skillful software developer, start with the free C# book and videos.

ASP.NET MVC Practical Hands-On Lab Tutorial (Free from the Software University)

$
0
0

As part of the ASP.NET MVC Web Development course at the Software University I developed a practical MVC hand-on lab (tutorial) that gives rich experience in building data-driven Web applications with ASP.NET MVC, ASP.NET MVC 5, SQL Server, C#, Visual Studio, Entity Framework (code first), AJAX, jQuery, Bootstrap and other modern technologies and tools. In this lab you will create a web based event management sytem, from zero to fully working web application. Enjoy this free practical ASP.NET MVC tutorial for beginners. The source code is intentionally given as images to avoid copy-pasting.

ASP.NET MVC Lab (May 2015) – Web Based Events Management System

The goal of this lab is to learn how to develop ASP.NET MVC data-driven Web applications. You will create MVC application to list / create / edit / delete events. The recommended development IDE to use for this Lab is Visual Studio 2013 with the latest available updates + SQL Server 2012. Let’s start building the event management system in ASP.NET MVC step by step.

Project Assignment

Design and implement a Web based event management system.

· Events have title, start date and optionally start time. Events may have also (optionally) durationdescription, location and author. Events can be public (visible by everyone) and private (visible to their owner author only). Events may have comments. Comments belong to certain event and have content (text), date and optional author (owner).

·  Anonymous users (without login) can view all public events. The home page displays all public events, in two groups: upcoming and passed. Events are shown in short form (title, date, duration, author and location) and have a [View Details] button, which loads dynamically (by AJAX) their description, comments and [Edit] / [Delete] buttons.

· Anonymous users can register in the system and login / logout. Users should have mandatory email, password and full name. User’s email should be unique. User’s password should be non-empty but can be just one character.

· Logged-in users should be able to view their own events, to create new events, edit their own events and delete their own events. Deleting events requires a confirmation. Implement client-side and sever-sidevalidation data validation.

· A special user “admin@admin.com” should have the role “Administrator” and should have full permissions to edit / delete events and comments.

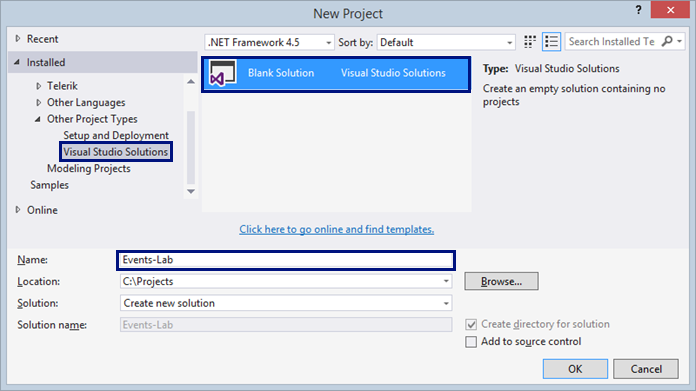
Step 1.  Empty Visual Studio Solution

Create a new empty Visual Studio Solution named “Events-Lab“:

image001

This VS solution will hold your projects: data layer project and ASP.NET Web application project.

Step 2.  Empty MVC Project with User Accounts

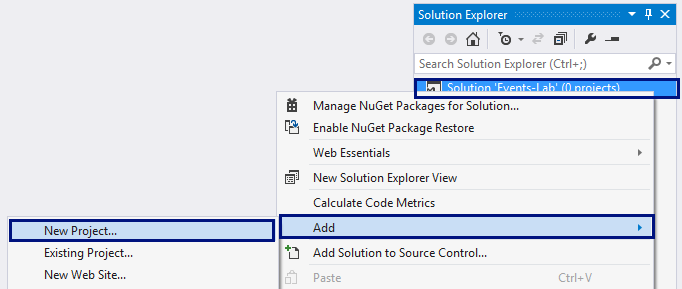
Create and empty ASP.NET MVC project by the default Visual Studio template with built-in user accounts and authentication. First, click on the solution, choose [Add] à [New Project…]:

image002

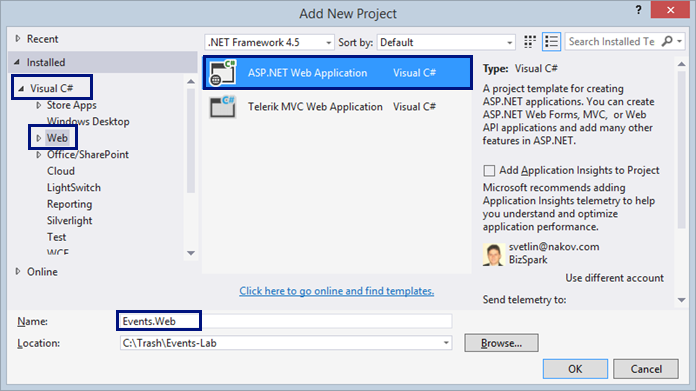
Choose [Visual C#] à [Web] à [ASP.NET Web Application]. Name the application “Events.Web“. It will hold your ASP.NET MVC Web application (controllers, views, view models, etc). The data access layer (entity classes + Entity Framework data context) will be separated in another application.

image003

Next, choose the “MVC” project template + “Individual User Accounts” as authentication type.

image004

Visual Studio will generate an ASP.NET MVC application by template, which will serve as start (skeleton) for your Events management system. The application uses a typical Web development stack for .NET developers:ASP.NET MVC 5 as core Web development framework, Bootstrap as front-end UI framework, Entity Framework as data layer framework, ASP.NET Identity system as user management framework, and SQL Server as database.

Step 3.   Customize the MVC Application

The project generated by the Visual Studio template needs many adjustments. Let’s customize the generated code for your Events management system.

1.       Edit the connection string in the Web.config file to match your database server settings. In our case, we will use a database “Events” in MS SQL Server 2014 Local DB: (LocalDb)\MSSQLLocalDB:

image005

2.       Delete some unneeded files:

o   AssemblyInfo.cs – holds application metadata (not needed at this time)

o   App_Data folder – holds the application database (not needed, we will use SQL Server Local DB)

o   favico.ico – holds the Web application icon used in the browser location bar. We will not use it. We can add it later.

o   Project_Readme.html – holds instructions how to start out MVC project

image006

3.       Build and run the application to check whether it works, e.g. by clicking [Ctrl + F5]:

image007

4.       Test the user registration functionality. You should have out-of-the-box user registration, login and logout:

image008

You have a problem. By default, the MVC application is configured to use too complex passwords. This will make hard the testing during the development.

5.       Let’s change the password validation policy:

·         Modify the PasswordValidator in the file App_Start\IdentityConfig.cs:

image009

·         Modify the password minimum length in the class RegisterViewModel. It is located in the file  Models\AccountViewModels.cs:

image010

·         Modify the password minimum length in the SetPasswordViewModel and ChangePasswordViewModel classes, located in the file  Models\ManageViewModels.cs:

image011

6.       Recompile and run the application again. Test the user registration, login and logout again. E.g. try to register user “test@test.com” with password “1“:

image012

After a bit of waiting, Entity Framework will create the database schema in SQL Server and the MVC application will register the user in the database and will login as the new user:

image013

7.       Open the database to ensure it works as expected. You should have a database “Events” in the MS SQL Server Local DB, holding the AspNetUsers table, which should hold your registered user account:

image014

8.       Now let’s edit the application layout view. Edit the file \Views\Shared\_Layout.cshtml.

·         Change the application’s title:

image015

·         Change the navigation menus. Change the home page link. Replace the “About” and “Contact” links with the code shown below. The goal is to put “My Events” and “Create Event” links for logged-in users only. Anonymous site visitors will have only “Events” link to the home page, while logged in users will be able to see their events and create new events:

image016

·         Change the application footer text as well:

image017

·         Remove the junk code from the home controller’s default view \Views\Home\Index.cshtml:

image018

·         Remove the unneeded HomeController‘s actions “About” and “Contacts“:

image019

·         Delete the unneeded Home controller’s views About.cshtml and Contact.cshtml:

image020

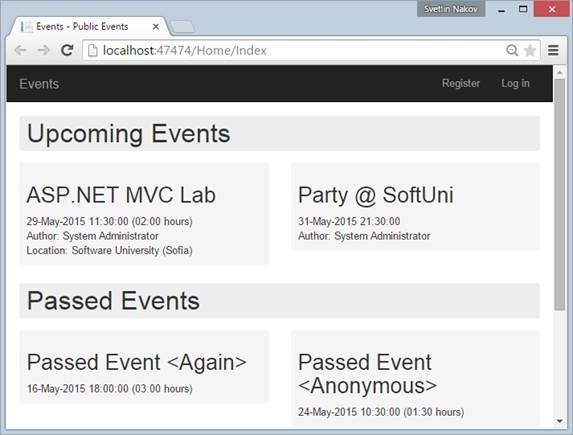
9.       Now run the application to test it again. It should look like this for anonymous users:

image021

After login, the application should display the user’s navigation menus. It should look like this:

image022

Now you are ready for the real development on the Events management system. Let’s go.

Step 4.  Separate the EF Data Model from the MVC Application

The application structure is not very good. It mixes the entity data models with the Entity Framework data context and the MVC view models for the views and MVC input models for mapping the forms. Let’s restructure this.

1.       Create a new Class Library project “Events.Data” in your solution in Visual Studio:

image023

2.       Delete the unneeded files from the Events.Data project:

image024

3.       Move the file Events.Web\Models\IdentityModels.cs to the new project Events.Data. You can use [Edit] à [Cut] à [Paste].

image025

4.       Now the Visual Studio Solution will not compile. Many errors will be shown if we rebuild with [F6]:

image026

We need to fix some issues: class names, file names, library references, project references, etc.

5.       Extract the class ApplicationUser into a file named “ApplicationUser.cs“. Change its namespace to “Events.Data“. Your code should look like this:

image027

6.       Rename the IdentityModel.cs file to ApplicationDbContext.cs. This file will hold your Entity Framework database context – the class ApplicationDbContext. Change its namespace to Events.Data. Your code should look like this:

image028

7.       Your code will still not compile. Now you should add NuGet references to the missing libraries: Entity Framework, Microsoft.AspNet.Identity.Core and Microsoft.AspNet.Identity.EntityFramework:

image029

image030

It is enough to reference the package “Microsoft.AspNet.Identity.EntityFramework“. The others depend on it and will be installed by dependency.

8.       Fix the missing using …” in the code. The project Events.Data should compile without errors.

9.       The project Events.Web will not compile due to missing classes: ApplicationUser and ApplicationDbContext. Let’s fix this.

10.   Add project reference from Events.Web project to Events.Data project:

image031

11.   Fix the missing using Events.Data;” statements in the Events.Web project.

Now the project should compile correctly. If not, check your library and project references and “using” statements.

12.   Test the MVC application. It should work correctly. Test the Home Page, Register, Login and Logout:

image032

Step 5. Define the Data Model

Now you are ready to define the data model for the Events management system: entity classes + Entity Framework database context + data migration classes. Let’s define the entity classes:

1.       First, add a full name in the ApplicationUser class. It will hold the name of the event’s author:

image033

2.       Next, create your Event class. It will hold the events and their properties:

image034

image035

Compile your code. It should compile without errors.

3.       Create your Comment class. It will hold the comments for each event:

image036

Compile your code. It should compile without errors.

4.       Add comments to the Event class:

image037

image038

Compile again your code. It should compile without errors.

5.       Modify the ApplicationDbContext class to include the events and comments as IDbSet<T>:

image039

Compile again your code. It should compile without errors.

6.       Run the MVC application. It will fail at the Login action. Think why!

image040

You need a migration strategy for the database, right? How shall changes in the DB schema be handled?

Step 6.   Configure Database Migrations

Now you will configure automatic migration strategy for the database to simplify changes in the database schema during the project development.

1.       First, enable the database migrations from the Package Manager console for the Events.Data project:

image041

The command “Enable-Migrations” will generate a file Migrations\Configuration.cs in the Events.Data project:

image042

2.       The generated DB migration class has non-informative name. It is a good practice to rename it: Configuration à DbMigrationsConfig. Rename the file that holds this class as well: Configuration.cs àDbMigrationsConfig.cs.

image043

3.       Edit the DB migration configuration: make the class public (it will be used by the MVC project); enable automatic migrations; enable data loss migrations:

image044

4.       Set the database migration configuration in the database initializer in your Global.asax file in your MVC Web application:

image045

5.       Now run the MVC application to test the new database migration strategy. Rebuild the application and run it. The application will fail!

image046

Seems like the database migration has not been executed, right? You could also check the database:

image047

The new tables (Events and Comments) are missing.

6.       Let’s fix this problem. The easiest way is just to drop the database:

image048

7.       Let’s run the MVC Web application again and try to login. It will say “Invalid login“:

image049

This is quite normal: we dropped the entire database, right? Let’s see what the database holds now:

image050

8.       Let’s register a new account. The application will fail with “Entity Validation Errors“:

image051

The problem comes from the field “FullName” in the ApplicationUser class. It is required but is left empty.

9.       We need to change the RegisterViewModel, the Register.cshtml view and the Register action in the AccountController to add the FullName property:

image052

image053

image054

10.   Now run the application and try to register a new user account. It should work correctly:

image055     image056

Step 7.  Fill Sample Data in the DB (Seed the Database)

You are ready to fill the database with sample data. Sample data will help during the development to simplify testing. Now let’s fill some data: create admin account and a few events with few comments. The easiest way to do this is to create a Seed() method in the database migration strategy.

1.       In the Seed() method check whether the database is empty. If it is empty, fill sample data. The Seed() method will run every time when the application starts, after a database schema change. You can use sample code like this:

image057

In this example, the default administrator user will be “admin@admin.com” with the same password. This will simplify testing, because some actions require administrator privileges in the system.

2.       Now, let’s create the admin user and the administrator role and assign administrator role to the admin user:

image058

image059

3.       Next, create some events with comments:

image060

4.       Add some code to create a few more events:

·         Few upcoming events

·         Few passed events

·         Few anonymous events (no author)

·         Events with / without comments

5.       Drop the database and restart the Web application to re-create the DB.

If you get “Cannot open database” error, stop the IIS Server, rebuild and run the MVC application again:

image061

Stopping the IIS Express web server (Internet Information Services):

image062

6.       Check the data in the Events database. It should hold few records in the Events, Comments, AspNetUsers, AspNetRoles and AspNetUserRoles:

image063

Now you have sample data in the Events database and you are ready to continue working on the Events management MVC Web application.

Step 8.  List All Public Events at the Home Page

Listing all public events at the home page passes through several steps:

·         Create EventViewModel to hold event data for displaying on the home page.

·         Create UpcomingPassedEventsViewModel to hold lists of upcoming and passed events.

·         Write the logic to load the upcoming and passed events in the default action of the HomeController.

·         Write a view to display the events at the home page.

1.       Create a class Models\EventViewModel.cs to hold event data for displaying on the home page:

image064

2.       Create a class Models\UpcomingPassedEventsViewModel.cs to hold lists of upcoming and passed events:

image065

3.       Create a class Controllers\BaseController.cs to hold the Entity Framework data context. It will be used as base (parent) class for all controllers in the MVC application:

image066

4.       First extend the BaseController from the HomeController to inherit the DB context:

image067

5.       Now write the code in the default action Index() of the HomeController to load all public events:

image068

The idea of the above code is to select all public events, ordered by start date, then transform them from entity class Event to view model class EventViewModel and split them into two collections: upcoming and passed events.

6.       Finally, create the view to display the events at the home page – \Views\Home\Index.cshtml:

image069

7.       The above code shows the upcoming events only. Add similar code to list the passed events as well.

8.       You need to define a display template for the EventViewModel class. It will be used when the Razor engine renders this code: @Html.DisplayFor(x => x.UpcomingEvents). Create the display template in the file\Views\Shared\DisplayTemplates\EventViewModel.cshtml:

image070

9.       Build and run the project to test whether it works correctly. If you have a luck, the code will be correct at your first attempt. The expected result may look like this:

image071

10.   Now let’s add some CSS styles to make the UI look better. Append the following CSS style definitions at the end of the file \Content\Site.css:

image072

11.   Refresh the application home page to see the styled events:

image073

12.   Good job! Events are displayed at the home page. Now let’s optimize a bit the HomeController. It holds a code that loads an Event object into a new EventViewModel object:

image074

This code can be moved to the EventViewModel class to make the HomeController cleaner:

image075

Looks complex, but it is not really. This static property is used in .Select(…) queries to transform Event into EventViewModel. Such transformations are boring and work better encapsulated in the view model class. Now the HomeController can use this static property as follows:

image076

13.   Build and test the project again to ensure it woks correctly after the refactoring.

Step 9.  List Events Details with AJAX

The next step in the development of the Events management application is to display event details dynamically with AJAX. The goal is to achieve the following functionality:

image077

1.       First, let’s define the EventDetailsViewModel class that will hold the event details:

image078

It will internally refer the CommentViewModel class:

image079

2.       Next, let’s write the AJAX controller action, that will return the event details when users click the [View Details] button:

image080

The above logic is not quite straightforward, because event details should be shown only when the user has permissions to access them:

·         The event author can view and edit its own events (even private).

·         System administrators can view and edit all events (even private).

·         Public events are visible by everyone, but not editable by everyone.

3.       It is quite good idea to extract the check whether the current user is administrator in the BaseController:

image081

4.       Next, let’s create the partial view that will be returned when the AJAX request for event detail is made. The partial view for the above AJAX action should stay in \Views\Home\_EventDetails.cshtml.

First, display the event description:

image082

Next, list the event comments:

image083

Finally, show [Edit] and [Delete] buttons when the user has edit permissions:

image084

5.       Now, let’s edit the events display template \Views\Shared\DisplayTemplates\EventViewModel.cshtml and add the AJAX call in it:

image085

6.       Let’s test the new functionality. Everything works fine, except that the AJAX action link is executed as normal link without AJAX:

image086

7.       What is missing? The script that handle the AJAX calls are not loaded in the page. Let’s add it.

·         First, install the NuGet package Microsoft.jQuery.Unobtrusive.Ajax in the project Events.Web:

image087

·         Register the Unobtrusive AJAX script in the bundles configuration file App_Start\BundleConfig.cs, just after the jQuery bundle registration:

image088

·         Include the unobtrusive AJAX script in the view which needs AJAX: \Views\Home\Index.cshtml

image089

This code will render the “~/bundles/ajax” bundle in the section “scripts” in the site layout:

image090

8.       Now the AJAX functionality should work as expected:

image091

The network requests in the Web browser developer tools shows that the AJAX call was successfully executed:

image092

Step 10.   Create New Event

The next feature to be implemented in the Events management system is “Create New Event“. This will require creating a “New Event” form (Razor view) + input model for the form + controller action to handle the submitted form data.

1.       First, let’s define the input model for the create or edit event form. It will hold all event properties that the user will fill when creating or editing an event. Let’s create the class Models\EventInputModel.cs:

image093

It is a good idea to attach validation annotations like [Required] and [MaxLength] for each property to simplify the validation of the form.

2.       Next, let’s create the “New Event form. The easiest way to start is by using the Razor view generator in Visual Studio. Create a folder “\Views\Events“. Right click on the “Events” folder and choose [Add] à [View…]:

image094

Enter a view name Create“. Select template Create“. Select the model class EventInputModel (Events.Web.Models)“. Click [Add] to generate the view:

image095

Visual Studio will generate the “Create Event” form:

image096

3.       Now customize the generated form. Change several things:

·         Change the Title à “Create Event”

image097

·         Remove the “Back to List” link:

image098

·         Add [Cancel] link to “My Events”, just after the [Create] button:

image099

4.       Create EventsController to handle the actions related to events: create / edit / delete / list events.

image100

image101

image102

5.       Add the “Create” action (HTTP GET) to display the “New Event” form:

image103

6.       Build the project, run it and test the new functionality (login and click [Create Event]). The “New Event” form should be rendered in the Web browser:

image104

Create New Event Logic

After the “Create New Event” form is ready, it is time to write the logic behind it. It should create a new event and save it in the database. The correct way to handle form submissions in ASP.NET MVC is by HTTP POST action in the controller behind the form. Let’s write the “Create New Event” logic.

1.       First, extend the BaseController to inherit the database context:

image105

2.       Next, write the action to handle POST \Events\Create:

image106

3.       Run and test the code. Now creating events almost works:

image107

When the form is submitted, the result will be like this:

image108

This is quite normal. The “My” action in the EventsController is not missing.

4.       Let’s define the action “My” and the view behind it in the EventsContoller:

image109

Create an empty view \Views\Events\My.cshtml (it will be implemented later):

image110

5.       Now run and test the application again:

image111 àimage112

Check the database to see whether the new event is created:

image113

6.       At the home page the new event is not listed. Why? The event is not public. Let’s make the “Is Public?” check box in the “New Event” form checked by default:

image114

Step 11. Notification System (Info / Error Messages)

The next big step will be to add a notification system to display informational and error messages like these:

image115

Typically, MVC controller actions that modify DB objects (e.g. EventsController.Create) work as follows:

·         Check the model state. If the validation fails, the model state will be invalid and the controller will re-render the form. The form will show the errors for each incorrect field.

·         If the model state is correct, create / edit the database object behind the form.

·         Add a notification message to be shown at the top of the next page shown in the Web application.

·         Redirect to another page that lists the created / modified DB object.

As the “Post-Redirect-Get” pattern says, in Web applications it is highly recommended to redirect to another page after executing an action that changes something at the server side:http://en.wikipedia.org/wiki/Post/Redirect/Get.

The missing part in ASP.NET MVC is the notification system, so developers should either create it, or use some NuGet package that provides notification messages in ASP.NET MVC. Let’s install and use the NuGet packageBootstrapNotifications:

1.       From the package management console in Visual Studio install the NuGet package BootstrapNotifications in the Events.Web project:

image116

NuGet will add the class Extensions\NotificationExtensions.cs:

image117

NuGet will also add a partial view \Views\Shared\_Notifications.cshtml:

image118

2.       To display the notification messages (when available) at the top of each page in the MVC project, render the _Notifications partial view in the site layout, just before the @RenderBody():

image119

3.       Put notifications in the controller actions after successful database change.

Use NotificationType.INFO for information messages (success) and NotificationType.ERROR for error messages. Not that these notifications will render after the first redirect to another page, because the implementation relies on the TempData dictionary in ASP.NET MVC.

Add notification messages after db.SaveChanges() in the actions that change the database, followed by RedirectToAction(…):

image120

4.       Run and test the application. Create an event to see the “Event created.” notification message:

image121

This looks a bit ugly, so add a fix in the \Content\Site.css:

image122

5.       Save the changes, refresh the site with [Ctrl + F5] and create a new event to test the changes:

image123

Step 12.  Date / Time / Duration UI Controls

The “New Event” form displays fields for entering date + time and duration. Currently the editor for these fields is not user-friendly. The date format is unclear and there is not calendar control. Let’s fix this. Let’s add “date-time picker” for the date and duration fields:

1.       Install the NuGet package “Bootstrap.v3.Datetimepicker.CSS“:

image124

It will add the following files to your MVC project:

·         \Scripts\bootstrap-datetimepicker.js

·         \Scripts\moment.js

·         \Content\bootstrap-datetimepicker.css

These files should be includes in all pages that use the date-time picker.

2.       Create CSS and JavaScript bundles for the date-time picker:

image125

3.       Create a placeholder for the CSS bundles in the _Layout.cshtml:

image126

It will be used later to inject the date-time picker’s CSS from the events editor form.

4.       Add the date-time picker’s scripts and CSS files in the “New Event” form, in \Views\Create.cshtml:

image127

This code will inject the specified CSS from the bundles in the page header:

image128

It will also inject the specified JavaScript from the bundles at the end of the page:

image129

5.       Now the site is ready to add the date-time picker in the “New Event” form. Let’s try to attach the date-time picker for the field “StartDateTime” in \Views\Events\Create.cshtml:

image130

6.       Now rebuild the project and run the code to test the new functionality. It does not work due to JavaScript error:

image131

7.       Seems like jQuery is not loaded. This is because the script for attaching the datetimepicker for the StartDateTime field uses jQuery, but the jQuery library loads later, at the end of the HTML document. This is easy to fix, just move the jQuery reference at the start of the HTML code in _Layout.cshtml:

image132

8.       Now rebuild the project and run the code to test again the new functionality. It should now work correctly:

image133

9.       In similar way, add a time picker for the “Duration” field:

image134

10.   Test the new duration picker by starting the Web application:

image135

Step 13.   Client-Side Unobtrusive Validation

Now the “New Event” form works as expected. There is a small UI problem: when invalid data is entered, the form validation is executed at the server side and the user sees the validation errors after post-back, with a small delay.

Let’s try to add client-side form validation. This is really easy, just insert the Microsoft jQuery Unobtrusive validation JavaScript bundle at the page holding the form:

image136

Test the “New Event” form to ensure the validation is now client side.

Step 14.         List My Events

Now let’s list current user’s events at its personal events page: \Events\My.

1.       First, add [Authorize] attribute in the EventsController:

image137

The [Authorize] attribute will redirect the anonymous users to the login form. It says that all controller actions of the EventsController can be accessed by logged-in users only.

2.       Next, add the HTTP GET controller action “My” in EventsController that will display current user’s events:

image138

3.       Finally, create the view My.cshtml behind the above action. It is essentially the same like the Index.cshtml view of the HomeController, right? Duplicating code is very bad practice, so let’s reuse the code. First, extract a partial view \Views\Shared\_Events.cshtml, then reference it from \Views\Events\My.cshtml and again from \Views\Home\Index.cshtml:

image139

image140

image141

4.       Test the new functionality “My Events“, as well as the old functionality “Home Page“:

image142

image143

5.       Try also to access “My Events” for anonymous user. The application should redirect you to the login page:

image144

Step 15. Edit Existing Event Form

The “Edit Event” functionality is very similar to “Create Event“. It uses the same input model Events.Web.Models.UpcomingPassedEventsViewModel. Create a view \Views\Events\Edit.cshtml and reuse the logic from \Views\Events\Create.cshtml by extracting a partial view \Views\Events\_EventEditorForm.

Step 16.  Edit Existing Event Logic

Write the controller action for editing events in the EventsController.

1.       Write a HTTP GET action “Edit” to prepare the form for editing event. In case of invalid event ID, show an error message and redirect to My Events“:

image145

2.       The logic in LoadEvent(id) method loads an existing event in case the user has permissions to edit it:

image146

3.       Write a HTTP POST action “Edit” to save the changes after submitting the event editing form. It should first check the event ID and show an error of case of non-existing event or missing permissions. Then it checks for validation errors. In case of validation errors, the same form is rendered again (it will show the validation errors). Finally, the Edit method modifies the database and redirects to “My Events“:

image147

4.       Run and test the new functionality “Edit Event” by opening \Events\Edit\3.

Step 17.   Handling HTML Special Characters

Try to create an event named “<New Event>“:

image148

It will fail, because by default ASP.NET MVC does not allow forms to send HTML tags in the fields values. This is to help protecting from Cross-Site Scripting (XSS) attacks. You will see an ugly error page:

image149

This is very easy to fix, just add [ValidateInput(false)] attribute in the BaseController:

image150

Step 18.   Delete Existing Event Form

Create a form and controller action, similar to “Edit Event”. The form should load the event data in read-only mode with [Confirm] and [Cancel] buttons.

Step 19.   Delete Existing Event Logic

The logic behind the “Delete Event” from is similar to “Edit Event”. Try to implement is yourself.

Step 20.   Add Comments with AJAX

For each comment implement [Add Comment] button that shows (with AJAX) a new comment form. After the form is submitted, it creates a comment and appends it after the other comments for the current event. Comments can be added by the currently logged-in user and anonymously (without login).

Step 21.  Delete Comments

Comments can be deleted only by their author (owner) and by administrators. Display [Delete] button right after each comment in the events (if deleting is allowed). Clicking [Delete] should delete the comment after modal popup confirmation.

Step 22.    Add Paging

Implement paging for the events. Display 15 events per page. At each page display the pager holding the number of pages as well as [Next Page] / [Previous Page] links.

Step 23.   Upload and Display Event Image

Modify the “Create Event” form to upload an image for the event (optionally). The image should be at most 100 KB, max width 400, max height 400, min width 100 and min height 100 pixels. Images should be gif, png orjpeg files, stored in the file system, in files named like this: event-185.png. Hold the images in a directory “~/Images“. Protect the directory to disable direct HTTP access to it.

Create an action /event/image/{id} to download and display an event image. It should read the image from the file system and display it if the user is allowed to view it (owner or administrator or public event).

Modify the event listing views to display the image for each event (when available). Use max-width and max-height attributes to ensure the image will resize correctly for different sizes of its container.

The Full Source Code of the Events MVC Application

Download the fully-functional application source code here: https://softuni.bg/trainings/24/ASP-NET-MVC-May-2015 (see section “Lab”).

Turtle Graphics .NET – C# Open Source Library

$
0
0

Albeit left behind to a certain extent, the good old turtle is still an excellent way to introduce people to the world of programming. “Turtle graphics” has implementations in a variety of languages with Logo being the trendsetter for the older school of programmers and survives to this day with a very beginner friendly and popular Python turtle module. Unfortunately, there is no official turtle graphics solution for one of the most popular languages for beginners today – C#. This makes people miss out on the fun factor of a simple, interactive introduction to coding.

Turtle Graphics .NET – Free Open-Source C# Library for Turtle Graphics

Worry not, though – Nakov.TurtleGraphics has you covered!

Turtle Graphics Library for C# and .NET

Available as package from NuGet (and as open-source project in GitHub), the Nakov.TurtleGraphics library is a simple, straight to the point solution designed for C# but it is easily transposable into any .NET language or environment you might choose to use. It presents a captivating way of introducing children or absolute newcomers to the way a programmer instructs machines. It comes with a concise instruction set, it is ready to use out of the box (using Windows Forms) and utilizes colorful visual feedback which is what makes it a perfect beginner solution.

Drawing with the Turtle in C#

For the uninitiated, the way Turtle Graphics works is very simple. You have your turtle and a set of simple instructions such as:

Turtle.Forward(200);
Turtle.Rotate(30);
Turtle.Backward(100);

Which respectively instructs the turtle to either rotate to a certain angle degree and advance with the specified distance, leaving a line behind when the “pen” is down, meaning that you can point and move the turtle without drawing a line when needed. Generally, the turtle adheres to the well known Cartesian coordinate system (having an X and Y axis, positive numbers being right/up and negatives being left/down). This is the simplest way to use the library, although it allows for more advanced use, which with a certain amount of creativity and determination, can leave you with a complete artwork!

How to Start with the Turtle in C# and Visual Studio?

First create an empty Windows Forms application in Visual Studio (yes, Windows Forms is more simple than WFP and is better for beginners):

Create Windows Forms App in Visual Studio

Install the NuGet package “Nakov.TurtleGraphics from the package manager console:

PM> Install-Package Nakov.TurtleGraphics

Or add it from the Solution Explorer by [Manage NuGet Packages…] menu:

Manage NuGet Packages in Visual Studio

Find the package from the search box. You can type “nakov” or “turtle” to find it:

Install Nakov.TurtleGraphics NuGet Package

Put a few buttons in the main form and set their names and properties as shown below:

Put buttons in Windows Forms

Specify your commands for the turtle in the [Draw] button’s “Click” event handler:

private void buttonDraw_Click(object sender, EventArgs e)
{
    Turtle.Rotate(30);
    Turtle.Forward(200);
    Turtle.Rotate(120);
    Turtle.Forward(200);
    Turtle.Rotate(120);
    Turtle.Forward(200);
}

Start the application by pressing [Ctrl+F5], then click the [Draw] button:

Turtle Graphics C# App

You can play a bit more, e.g. add the following code:

private void buttonDraw_Click(object sender, EventArgs e)
{
   // Assign a delay to visualize the drawing process
   Turtle.Delay = 200;

   // Draw a equilateral triangle
   Turtle.Rotate(30);
   Turtle.Forward(200);
   Turtle.Rotate(120);
   Turtle.Forward(200);
   Turtle.Rotate(120);
   Turtle.Forward(200);

   // Draw a line in the triangle
   Turtle.Rotate(-30);
   Turtle.PenUp();
   Turtle.Backward(50);
   Turtle.PenDown();
   Turtle.Backward(100);
   Turtle.PenUp();
   Turtle.Forward(150);
   Turtle.PenDown();
   Turtle.Rotate(30);
}

private void buttonReset_Click(object sender, EventArgs e)
{
   Turtle.Reset();
}

private void buttonShowHideTurtle_Click(object sender, EventArgs e)
{
   if (Turtle.ShowTurtle)
   {
      Turtle.ShowTurtle = false;
      this.buttonShowHideTurtle.Text = "Show Turtle";
   }
   else
   {
      Turtle.ShowTurtle = true;
      this.buttonShowHideTurtle.Text = "Hide Turtle";
   }
}

More Turtle Graphics Examples

Playing a bit more could uncover beautiful turtle-drawn images: hexagons, spirals, stars, others.

To draw a hexagone:hexagon

Turtle.Delay = 100;
for (int i = 0; i < 6; i++)
{
   Turtle.Forward(100);
   Turtle.Rotate(60);
}

To draw a green star:star

Turtle.Delay = 200;
Turtle.PenColor = Color.Green;
for (int i = 0; i < 5; i++)
{
   Turtle.Forward(200);
   Turtle.Rotate(144);
}

To draw a spiral:spiral

Turtle.Delay = 100;
Turtle.PenColor = Color.DarkGreen;
for (int i = 0; i < 20; i++)
{
   Turtle.Forward(i * 10);
   Turtle.Rotate(60);
}

To draw a sun:sun

Turtle.Delay = 50;
Turtle.PenColor = Color.Yellow;
for (int i = 0; i < 36; i++)
{
   Turtle.Forward(250);
   Turtle.Rotate(170);
}

To draw a triangle spiral:triangle-spiral

Turtle.Delay = 100;
Turtle.PenColor = Color.Red;
for (int i = 0; i < 6; i++)
{
   Turtle.Forward(100);
   Turtle.Rotate(60);
}

Turtle Commands

You can use one of the following commands to allow learners to start creating with no more than a few clicks. Although this doesn’t employ the utmost correct object-oriented practices (for the purpose of simplicity), these all are static methods of a single class Turtle:

  • Init() – initializes the turtle graphics system. Callers can specify the target Windows Forms control to hold the drawing surface (e.g. a Panel). If not specified, the currently active form is used as a drawing surface. If not called, it will be called on demand with the first turtle move / draw command. Initially the turtle location is {0, 0} (the screen center) and the direction (angle) is 0 degrees (up).
  • Dispose() / Reset() – destroys the turtle graphics system and deallocates all resources, associated with it.
  • Forward(distance) – moves the turtle forward in the current direction by the specified distance. If the pen is down, the turtle draws a line from the current to the new position, otherwise it just moves without leaving a track.
  • Backward(distance) – moves the turtle in backward direction and draws a line if the pen is down.
  • MoveTo(x, y) – moves the turtle to the specified position and draws a line if the pen is down.
  • Rotate(angle) – rotates the turtle relatively to the current direction. The rotation angle is given in degrees (e.g. 45, -30, 315, …).
  • RotateTo(angle) – rotates the turtle to the specified angle in degrees (e.g. 0, 45, 180, 315, …).
  • PenUp() – takes the pen off the drawing surface (makes the turtle move without drawing a line). Further calls to Forward(distance) / Backward(distance) /MoveTo(x, y) will move the turtle without drawing a line.
  • PenDown() – puts the pen back on the drawing surface (makes further moves drawn lines). Further calls to Forward(distance) /Backward(distance) / MoveTo(x, y) will draw a line from the current to the new position.
  • X – gets / sets the current turtle horizontal position. The initial turtle position is the screen center {0, 0}. Increasing X will move the turtle right.
  • Y – gets / sets the current turtle vertical position. The initial turtle position is the screen center {0, 0}. Increasing Y will move the turtle up.
  • Angle – gets / sets the current turtle direction (angle in degrees). The value of 0 means up, 90 means right, 180 means down and 270 means left. The Angle is always kept in the range [0…360). Initially the angle is 0.
  • PenColor – gets / sets the color of the pen. The default pen color is “blue”.
  • PenSize – gets / sets the size of the pen (in pixels). The default pen size is 7.
  • PenVisible – gets / sets the visibility of the pen. The default pen size is true. True means the pen is down (drawing a line when the turtle moves). False means the pen is up (no line is drawn when the turtle moves).
  • ShowTurtle – gets / sets whether the turtle is visible. By default it is visible.
  • Delay – gets / sets the turtle delay in milliseconds after moving / rotating. By default the delay is 0 (no delay). Setting it between 200 and 300 will give you enough delay to simulate a visually pleasant animation effect.

Nakov.TurtleGraphics Library at the Software Euniversity (SoftUni)

Whereas the aforementioned describes this excellent library in a solely technical manner, you can observe for yourself the way TurtleGraphics.NET works in a living, breathing learning environment in Software University’s Programming Basics course – an ever evolving solution to the lack of software developers which is currently taking education by storm and revolutionizing the way future developers start walking the path towards innovation.

Turtle Graphics for C# Project at GitHub

Play with the source code of the Nakov.TurtleGraphics library at GitHub. It is open-source: https://github.com/nakov/TurtleGraphics.NET.

Безплатни курсове по програмиране в 28 града за напълно начинаещи от януари 2017 г.

$
0
0

Софтуерният университет (СофтУни) организира безплатни курсове по програмиране за напълно начинаещи в 28 града из цяла България от януари 2017 г. Целта е всеки, който има интерес към програмиране и технологии, да опита програмирането и се увери сам дали е за него и дали иска да се занимава сериозно. Повече програмисти и ИТ специалисти означава по-силна икономика и по-добър стандарт на живот в България, не само за ИТ специалистите, но и за всички останали.

Кои са градовете с безплатни курсове по програмиране?

В безплатните обучения могат да се включат ученици, студенти и работещи, присъствено в следните градове: София, Пловдив, Варна, Бургас, Русе, Стара Загора, Плевен, Добрич, Шумен, Сливен, Ямбол, Хасково, Велико Търново, Горна Оряховица, Благоевград, Перник, Казанлък, Пазарджик, Враца, Видин, Кърджали, Габрово, Кюстендил, Гоце Делчев, Търговище, Раковски, Белоградчик, Карнобат. Присъствените места са ограничени според капацитета на учебните зали.

Какво е да си програмист?

Ако се чудите дали програмирането е за вас, най-добре го пробвайте. Едно е да четеш и слушаш разкази за програмисти и ИТ специалисти, друго е да се потопиш директно и практически в програмирането, да да решаваш проблеми, пишеш код, да дебъгваш, да създаваш софтуер с ръцете си и с ума си. СофтУни предлага да опиташ на практика безплатно какво е да програмираш и след това да вземеш решение дали искаш да станеш програмист, ИТ специалист или дигитален експерт или пък искаш да учиш и работиш нещо съвсем друго.

Ако все пак искате да прочетете повече за програмистите и софтуерните инженери, за езиците за програмиране и технологиите, които се използват в практиката, за професиите в софтуерната индустрия и как е става софтуерен инженер, имаме много добър наръчник за начинаещия в програмирането, създаден лично от д-р Светлин Наков:

Какво е СофтУни?

Софтуерният университет (СофтУни) е най-голямата и най-значимата образователна организация в сферата на програмирането, ИТ професиите и дигиталните компетенции в България. В обученията на СофтУни се включат между 2000 и 3000 души на месец и голяма част от тях трайно се захващат с дигитални професии. СофтУни организира над 100 учебни курса на година, включващи програмиране, софтуерни технологии, компютърна графика и дизайн, дигитален маркетинг, информационни технологии и развиване на практически дигитални компетенции.

СофтУни е иновативен и модерен образователен център, който създава истински професионалисти в света на програмирането. Обучението в СофтУни е по модела „учене чрез правене“, при което чрез практически занимания се предават фундаменталния знания от компютърните науки и софтуерното инженерство (30%) и се натрупва реален практически опит в най-търсените и съвременни езици за програмиране и софтуерни технологии (70%), а след завършване (и понякога още в средата на обучението) студентите са готови да стартират своята кариера като успешни софтуерни инженери. Образованието в СофтУни обхваща 20-25 учебни курса, организирани в систематичен учебен план по софтуерно инженерство с продължителност 1-3 години (според избраната професия).

Обучението по програмиране – важна национална кауза

Безплатните обучения по програмиране в цялата страна са вероятно най-значимият и най-мащабният образователен проект за софтуерната индустрия, който се е случвал в последните години. Очаква се в обученията да се включат над 5000 ученици, студенти и работещи, които ще опитат програмирането (присъствено или онлайн) и много от тях ще се запалят по ИТ професиите. Това е важна национална кауза: да дадем знания, умения, професия, работа и бъдеще на хиляди млади хора от всички краища на България, и да задвижим икономиката на страната, за да се вдигне жизненият стандарт.

ИТ секторът е сред най-добре платените в България, в него работят много от най-будните, най-умните, най-интелигентните, най-трудолюбивите, най-амбициозните и най-прогресивните. Софтуерната индустрия дава хляб директно на около 25 000 души (по данни на софтуерната асоциация БАСКОМ) и индиректно на поне още 3 пъти по толкова. ИТ специалистите плащат огромни данъци и индиректно задвижват и други сектори на икономиката. С 18 000 програмисти (по официални данни) към 2016 г. се произвеждат близо 2% от брутния вътрешен продукт (БВП) на страната. Ако броят на заетите в ИТ сектора значително се увеличи, това ще доведе до значим икономически ефект и по-висок жизнен стандарт в България.

Моята лична кауза и каузата на #СофтУни е да създадем 100 000 работещи в ИТ сектора в България до 2025 г. и да се приближим към голямата цел: България – силициева долина на Европа, център за високи технологии, иновации и предприемачество.

Присъствено и онлайн (дистанционно) обучение

Безплатните обучения по програмиране за начинаещи в цялата страна включват присъствени и онлайн занятия (според избраната форма на обучение).

На присъствените занятия се обяснява нов материал и се решават практически задачи под надзора на преподаватели, асистенти и ментори. Участниците в София получават безплатно и личен ментор, който им помага персонално за задачите (в лична среща, по FB, Skype и други канали).

Онлайн участниците получават видео-уроци и наставления за самостоятелна практическа работа вкъщи, съчетани с непрестанна помощ онлайн. Те получават обратна връзка (оценка) за решенията на задачите си чрез автоматизирана системата за проверка (online judge).

За кого е безплатният курс по програмиране?

Курсът по програмиране за абсолютно начинаещи е изключително практически, с много писане на код и решаване на задачи по програмиране от практиката. Всяка решена задача се оценява автоматично от онлайн системата “SoftUni Judge” и резултатите излизат на момента (в реално време). Курсът е изключително старателно подготвен лично от Светлин Наков и в него е натрупан опит от вече над 70 учебни групи за последните 3 години.

Целият начален курс по програмиране се провежда на български език. Учебните занятия, учебните материали (презентации, задачи, решения, инструкции, видео), учебната система, форумът и всички останали ресурси са на български език.

Курсът по програмиране е подходящ за ученици от 4 клас нагоре, както и за студенти, работещи друга професия, безработни и всички желаещи (дори пенсионери).

Какво обхващат безплатните уроци програмиране за начинаещи?

В безплатния курс по програмиране за начинаещи се изучават основите на програмирането: работа с данни, проверка на условия, използване на повторения (цикли), като се набляга на развиване на алгоритмично мислене чрез решаване на стотици практически задачи.

Използва се езикът C# и средата за разработка Visual Studio, но езикът няма съществено значение в толкова начален етап от навлизането в програмирането.

Чрез голямо количество практика курсът развива мисленето, което всеки един програмист трябва да притежава (алгоритмично мислене) и способността да решаваш задачи и да търсиш решения на проблеми, които възникват докато пишеш код, да търсиш информация и да се справяш.

Курсът се състои от 8 учебни занятия по 4 часа + незадължителен изпит накрая.

Ето ги и учебните теми, разработени лично от Светлин Наков:

  • Кодиране за начинаещи – представяне на курса
  • Първи стъпки в програмирането – писане на прости програми
  • Прости пресмятания с числа – променливи и данни
  • Логически проверки – if-else конструкция
  • По-сложни логически проверки – вложени проверки, по-сложни логически условия
  • Повторения (цикли) – повтаряне на блок от команди многократно
  • Чертане на фигурки с цикли – вложени цикли и пресмятания
  • По-сложни цикли – алгоритмични задачи с цикли, условни конструкции и пресмятания
  • Подготовка за практически изпит по програмиране (приемен изпит в СофтУни)
  • Практически изпит по програмиране (незадължителен, за който иска сертификат или да продължи да учи)

Можете да надникнете в учебното съдържание чрез безплатните видео уроци от випуск януари 2016: https://softuni.bg/trainings/1297/programming-basics-january-2016.

Изпит и сертификат за завършващите

Обученията по основи на програмирането, организирани от СофтУни, завършват с незадължителен изпит по практическо програмиране, върху изучавания в курса учебен материал, който служи за прием в Софтуерния университет. Който се запали по програмирането и усети, че му харесва да се занимава с писане на код, може да продължи образованието си в СофтУни, където го очаква задълбочена 2-3-годишна програма, която завършва с професия и работна позиция в софтуерна фирма. Може да учите за няколко професии, сред които основните са C#/.NET софтуерен инженер, Java софтуерен инженер, JavaScript програмист или PHP уеб програмист.

При постигнат резултат от курс поне Много добър (5.00), участникът получава и сертификат от СофтУни за начални умения в програмирането.

Как да се запиша да уча програмиране безплатно?

Записването за безплатните уроци по програмиране (за всички градове, присъствено и онлайн) става от сайта на СофтУни. Попълнете формата за кандидатстване в срок до 5 януари 2017 г. от сайта на СофтУни ии се запишете за безплатно обучение по програмиране във вашия град:

https://softuni.bg/apply

SoftUni Global Learn to Code Community @ softuni.org

$
0
0

I am very happy to announce that SoftUni is now global. We are building a global learn-to-code community, which provides a free mentorship help for code learners, along with weekly code lessons with hands-on exercises, video tutorials, events for developers and other free learning resources. Come and join for free, learn coding, get help from our mentors and talk with other learners:

softuni.org

What is SoftUni Global Community?

SoftUni Global Community is an international community for people who learn coding, founded and supported by Svetlin Nakov (a famous software engineer and tech trainer) and SoftUni (the biggest tech education provider in South-East Europe).

The SoftUni global learn-to-code community provides high-quality learning resources for people who learn programming, free mentoring, community discussions, events and other resources. The community is based on the English language, which opens it up to people from all over the world.

At SoftUni we believe that learning in a groups, in a community, together with other learners, is quite more efficient and successful than learning alone. We believe in the power of communities and we guide our students from zero to their first developer job in a community-based environment. Now we expand globally with our free for anyone learn-to-code community.

Benefits for the Learn-to-Code Community Members

What people get from their free membership in the SoftUni Global Learn-To-Code Community?

  • High-quality learning resources for software development learners, available for free: coding tutorials, code lessons, hands-on exercises with automated grading, programming books, training courses and others.
  • Weekly code lessons: free video tutorials with hand-on exercises, focusing on different topics and aspects of software development, such as programming languages, data structures and algorithms, software technologies, databases, web development, front-end technologies, back-end technologies, mobile development, machine learning and many others.
  • Events for developers: inspirational and technical events for software engineers, with guests from big tech companies, who share their experience and advices about programming, software technologies and career development in the tech industry.
  • Free help from mentors, who are experienced software engineers. Our team of technical trainers, coding mentors and software developers from SoftUni will be happy to answer your questions and guide you in your code learning process.
  • Access to our free coding lessons and scheduled instructor-led courses, which build solid practical skills through high-quality teaching sessions, hands-on exercises and project-based learning experience, in groups, with mentors.

My Code Lessons

My plans for the next few months are to record and publish a few series of free code lessons on different topics from computer programming and software development. I will start with a practical hands-on Java tutorial, which combines video lessons with practical exercises with automated grading. All lessons, videos and resources will be in English.

I truly believe that to learn coding, you should code. You should practice! The only way to become a software developer is by writing code, a lot of code, every day, for years! This is what I am teaching my students in the last 20 years: to learn by doing, to practice every day, to solve coding problems, to write projects, to make mistakes, to fix them, to test and debug the code, to rewrite the code when it goes in wrong direction, to practice, practice, practice!

Practical learning with hands-on exercises and real-world software projects: this is how I trained 10K software engineers at SoftUni (together with my colleagues) and how they have a tech job (see their profiles in LinkedIn).

My First Code Lesson: Java Tutorial – Part 1 – Getting Started

This is the first episode from my “Code Lessons” series. It is the first from my “Java Tutorial” series, where I want to teach newbies the basics of Java programming:

Unlike most video tutorials for developers in YouTube, my free coding lessons always include a practical hands-on experience – a practical skill building exercises, where learners write code and sole practical coding problems. Try my coding lessons and you will experience coding. For most exercises I have prepared an automated grading system (the SoftUni judge), which evaluates your code and tells you whether its correct or wrong. This saves a lot of time, especially when you are a beginner in coding. Try it, believe me, experience my code lessons. They are free for everyone.

My YouTube Channel: Code with Nakov

Subscribe to my YouTube channelCode with Nakov“, where I post several times а week a new code lesson, technical talk, guest speaker session or live event on computer programming, software development and software technologies. Watch my free video lessons and programming tutorials and comment in the videos what do you like and what can be improved, propose new topics for video lessons, discuss and enjoy.

If you want to become a software developer, follow my code lessons and the practical hands-on exercises, coming with them. This is a good start that prepares you for mastering the software development profession, which requires significantly more efforts, and hard learning for a long time.

Soon I will announce my zero-to-job tech degree programs for absolute beginners in English, where I teach software engineering very seriously: from coding basics, loops, arrays and maps, through algorithmic thinking, problem solving and computer science concepts, to software technologies, databases, front-end and back-end and Web development.

Free Java Video Tutorial: Part 1 – Getting Started with Java

$
0
0

I am happy to announce that I am starting a free video tutorial for beginners in Java programming today:

Java Tutorial: Part 1 – Getting Started with Java Coding

This is a hand-on free training, with a plenty of practical coding exercises, which you solve and send for automated online grading. Try it! You learn coding by coding. Learn by doing: this is my proven educational concept, which helped me training 10K software engineers (see in LinkedIn).

Subscribe to my YouTube channel to stay in touch:

In the next few free Java video lessons from my tutorial I plan to cover the fundamentals of programming with Java: variables and data, writing control-flow logic (conditional statements and loops), basic data structures (arrays, lists and maps), working with objects and classes, troubleshooting and debugging the code, as well as basics of algorithmic thinking and problem solving.


Free Java Video Tutorial: Part 2 – Using Java IDE

$
0
0

I am happy to post my second code lesson in YouTube. This is the second part of my “Java tutorial” series of video lessons for absolute beginners:

Java Tutorial: Part 2 – IntelliJ IDEA

My plan for the next few weeks is to create an publish a tutorial of 10-15 free Java video lessons, which lay the foundation of programming in Java (Java coding, program logic, if-else, loops, basic data structures, arrays and lists, objects and classes). Then, I will continue with HTML, CSS and JavaScript. Meanwhile I will post free videos on some more advanced topics, such as databases, front-end and back-end technologies, cryptography, blockchain, as well as how to become a software engineer and start a tech job.

Subscribe to my YouTube channel to stay in touch:

I have further plans for my YouTube channel to invite guest speakers to cover interesting topics for developers, such as game development, DevOps, Linux, cloud technologies, machine learning, job interviews, agile development and many others.

Free Java Video Tutorial: Part 3 – Console-Based Input and Output

$
0
0

Today I published the third part of my free Java video tutorial with hands-on exercises. It covers the console-based input and output in Java: reading text and numbers using java.util.Scanner and printing text, numbers and formatted output using System.out.print(), System.out.println(), System.out.printf(). Learn more at softuni.org:

Watch the video tutorial in YouTube:

Subscribe to my YouTube channel to stay in touch:

I will continue publishing more code lessons on programming and software technologies.

My Java Basics Full Course: Free 13 Hours Java Video Tutorial + 74 Hands-On Exercises

$
0
0

I am happy to publish my free Java coding basics course for absolute beginners in computer programming (13 hours video tutorial + 74 hands-on exercises). This is an excellent Java coding video tutorial, which gets deep into basic programming concepts, such as coding techniques, algorithmic thinking, problem solving and debugging.

Access the free Java coding video lessons, practical hands-on assignments, the course slides, and the automated code grading system for your exercise solutions here:

This free Java programming course is designed for beginners who want to start with Java coding and find out if they like it. It covers the first steps in programming with Java:

  1. Installing the Java development tools and development environment
  2. Writing and running Java commands and simple programs in Java
  3. Receiving input from the user and printing text and numbers to the user
  4. Using data, operators and expressions to perform calculations
  5. Using the if-else and switch-case conditional statements
  6. Repeating blocks of code using loops: for-loops, while-loops and do-while loops
  7. Writing more complex control-flow logic, which combines loops, conditional statements, nested loops and nested conditions

Video Tutorial: Java Basics

Watch my free 13-hours Java coding full video course in YouTube:

Full Java Basics Course (Part 1 of 2): Data, Calculations, Conditions, If-Else
Full Java Basics Course (Part 2 of 2): For Loops, While Loops, Nested Loops

Course Instructor: Svetlin Nakov, PhD

I am Svetlin Nakov from SoftUni (the Software University), your Java coding instructor (LinkedIn: https://linkedin.com/in/nakov). I am an experienced tech trainer who helped in the last 20 years more than one hundred thousand young people to begin coding, learn software development and start a tech job. See the profiles of my graduates in LinkedIn: https://www.linkedin.com/school/software-university-softuni/people.

Just Google my name and you’ll find more about me, my programming books, software academies, conference talks and other teaching activities: https://www.google.com/search?q=Svetlin+Nakov.

More about me: Svetlin Nakov has 20+ years of technical background as software engineer, project manager, consultant, trainer, and digital entrepreneur with rich technical experience (back-end, Web development, information systems, databases, software engineering, cryptography, blockchain, C#, Java, JS, PHP, Python, front-end, HTML, CSS, JS frameworks). Svetlin Nakov is a regular speaker at hundreds of conferences, seminars, courses and other trainings and holds a PhD degree in computer science. He is author of 15 books about computer programming and software technologies, lives in Sofia, Bulgaria and works as an passionate trainer and inspirer at SoftUni.

Learn By Doing: Learn to Code by Coding Exercises and Projects

This free Java video course teaches skills, not just theory. Each course section comes with carefully prepared hand-on practical exercises, where you write code to solve practical problems, run and test your solutions, maybe make bugs, fix them, and test your code over and over until it finally works properly. The entire course provides more than 70 exercises, with automated grading in the SoftUni judge system.

Remember that coding is a skill, and it should be practiced, just like any other skill. Write code to learn the skill of coding!

Automated Grading System for Your Code

To check your solutions of the practical hands-on exercises from this course, I give you a free access to the SoftUni’s automated judge system, where you send your Java code, and you get automated grading: the judge tells you whether your solution is correct or wrong. This is quite useful. Try it and you will love it!

During the course lessons I will show you how to solve many coding problems. Follow my guidelines and sample solutions and write your own solutions. Try to solve the additional exercise problems as well. Write code, play with the code, experiment, make bugs and imperfections, fix them, write code, do it many times! This is how you acquire coding skills.

Spend Enough Time on the Exercises!

Don’t skip the coding exercises at the end of each course section! They are much more important than the video lessons. The exercises give you the practical skills, the skills needed for your next tech job.

If you are serious about programming, take this course with all its exercises. You should invest about 30 or maybe 40 hours. Yes, this is a lot of time, but learning programming takes time! Just like learning math. Did you remember how many hours you spent at school to learn the basics of math?

In case you have a question or difficulty solving some of the exercise problems, or you have a bug, and you don’t know how to fix it, we are here to help. Join the SoftUni community and ask our coding mentors for free anything about coding and particularly about this course and its practical exercises.

This Java Course is Just a Start

This course is just a start in Java programming. To become a software engineer and start a tech job, you should learn and practice programming 10-15 times more than what I give you in this course. It takes time and effort to build the skills for your first IT job, so be patient and keep coding for long time (1-2 years until your first developer job).

To become a junior Java developer, you should learn advanced coding, basic Java APIs, data structures and algorithms, object-oriented programming, databases and object-relational persistence frameworks, such as Hibernate and Spring Data, backend development, MVC frameworks and enterprise technologies, such as Spring Boot, Spring MVC and Java EE, as well as basic front-end skills, such as HTML, CSS, JavaScript, REST and AJAX. This is what the software companies expect from you as a junior Java developer. It takes time to get practical skills and experience with all these concepts and technologies, along with solid GitHub portfolio of Java projects.

If someone says that a beginner can learn programming and start a job in 3 or 5 months, don’t believe him. This is unlikely to happen. You better study slowly and thoroughly. The effort will pay off.

Free Help from Mentors

Join the SoftUni community at softuni.org and ask for free help from our mentors. Yes, you can ask anything about this training, and you’ll get a free answer! At SoftUni we already helped hundreds of thousands of students to learn coding. See their profiles at the SoftUni alumni page in LinkedIn: https://www.linkedin.com/school/software-university-softuni/people.

Java Basics: Course Topics

This practical free Java basics video course covers the following topics:

  1. Java Coding: First Steps. The Java Language, IDE, Writing Java Programs and Commands
  2. Expressions and Statements. Variables, Data Types, Operators and Expressions in Java. Console-Based Input and Output.
  3. Conditional Statements. Control-Flow Logic with the if-else Conditional Statements
  4. Advanced Conditional Statements. Nested and Complex if-else Statements
  5. For Loops in Java. Repeating Blocks of Code. Increasing a Variable from X to Y
  6. While Loops. Repeating Code Blocks While a Condition Is True. Nested Loops
  7. Nested Loops. Using Loops Inside Other Loops. Implementing More Complex Control-Flow Logic

The Judge System: Automatic Grading for Your Code

Before the start, I will show you the SoftUni judge system, where you can check your exercise solutions instantly, for free.

SoftUni Judge is an automated system for code evaluation. Just send your code solution for certain coding problem from this course and the system will tell you whether your solution is correct or not and what exactly is missing or wrong. I am sure you will love the judge system, once you start using it!

Java Coding: First Steps

This section is the beginning of our journey with Java coding. I will explain you what Java is, the Java programming language, the Java platform, JDK, the Java runtime environment, what a compiler is, what an IDE (integrated development environment) is, and how to write simple Java programs in IntelliJ IDEA, a modern Java IDE. I will demonstrate you how to write, compile and run Java programs with several code examples.

As a homework assignment, you will have a few hands-on exercises: writing a few simple Java programs, such as what I demonstrated to you, and submitting your solutions to the judge system.

Expressions and Statements in Java

In the next course section, I will talk about variables and data types (such as string, integer number, floating-point number, boolean and others), statements (which define the commands in the programs), the most used arithmetic operators (like plus, minus, multiply, divide and remainder) and the expressions in Java (or how to combine operators with values to implement a calculation).

I explain and demonstrate how to implement a console-based input and output in Java. I will show you how to read user input, format and print output to the console, and how to read and print text and numbers. I will teach you how to use the java.util.Scanner class to read text and numbers and how to work with integers and decimal numbers.

As a homework assignment you will have several hands-on exercises related to reading some data from the standard input, performing simple calculations with them and printing the results in a certain format.

Conditional Statements

In the next section I will explain and demonstrate how to write simple if-else statements in Java. Conditional statements (like the if-else statement, the switch-case statement and few other statements in Java) check some condition and if it is true, they execute certain block of code, otherwise they execute another block of code. We shall see how they work in practice and after that, as usually, you will have homework assignments.

You will have several hands-on exercises related to reading some data, performing a check and printing a result, depending on the input data and the checks.

Advanced Conditional Statements

In the next section of the free Java coding basics course, it’s time to start writing more complex program logic. I will show you how to use complex conditions in your if-statements: how to use the logical OR, logical AND, and logical NOT operators, as well as brackets, to design more complex checks. Additionally, I will demonstrate you through examples, how to write nested if-else statements, and longer sequences of if-else-else-if-else constructions. Together we shall solve several practical problems.

As usually, you will have a homework assignment: to solve a few hand-on exercises, that combine complex and nested conditions for processing some input data and calculating and printing certain results.

For Loops in Java

In the next course section I will teach you how to use the for-loop statement in Java, in its basic form.

In programming loops are used to repeat a block of code many times, typically for each value in given range. For example, we can write a for loop, which increases the value of a variable x from 1 to 50 and prints the value of x at each step. You will see how to do this in action, and then practice with the hand-on exercises, which I have prepared for homework.

While Loops

In the next section I will explain the concept of while loops. While loops in Java allow code blocks to be repeated, as long as certain condition is true. Let’s see how this works in more detail.

As usually, I will explain the concepts to you through examples, then you’ll have homework exercises to practice your new skills from this topic.

Nested Loops

In the next course section I will talk about nested loops. In programming, loops can be nested. This means putting another loop in the body of a loop. We can have several nested loops: we can have a loop in another loop, which holds a third loop.

And nesting is natural in the real world. For example, a building can have many floors and each floor can have many rooms. In this way we nest the floors inside the building and the rooms on each floor. If we want to walk around the building and print each of its rooms on each of the floors, we must use nested loops.

You will see how the nested loops work in action and then solve some practical exercises that I will give you as a homework.

Coding Exercises: The Most Important Part of This Course!

The most essential part of this practical Java training are the hands-on exercises: the homework assignments after each course section. The entire course provides more than 70 exercises, with automated grading in the SoftUni judge system. You should spend about 30 hours of coding to solve them. Yes, this is a serious effort, but it will pay off.

Remember that the only way you get practical skills is by practice: by writing code, by solving exercises. Watching video lessons can be pleasant and motivational, but you will never become a software developer by only watching videos. It is a good start, but it’s not enough.

Please, follow the exercises: solve the practical problems and send your solutions to the judge system for grading. You have more than 70 exercises to solve. Most of them were already solved in the video lessons, but the others were intentionally left for you.

Get Free Mentorship Help

In case you have a question or difficulty solving some of the exercise problems, or you have a bug, and you don’t know how to fix it, we are here to help.

Join the SoftUni community at softuni.org and ask for free help from our mentors. You can ask anything about this training, and you’ll get a free answer! At SoftUni we already helped hundreds of thousands of students to learn coding. See their profiles at SoftUni alumni at LinkedIn.

Join the SoftUni global learn-to-code community at softuni.org to get free access to the practical exercises and the automated judge system for this course. Get free help from mentors and meet other learners. It’s free!

My most successful teaching methodology is “learn by doing“. Write code, run the code, test the code, make mistakes, fix them, run and test again, finally submit your code in the judge. This is how you learn coding: by practice.

Subscribe to My YouTube Channel

Do you like this Java basics free programming course? Do you want more? Subscribe to my YouTube channel to stay in touch with my free coding courses, lessons and tutorials:

I will continue publishing more Java code lessons, tutorials and full courses on programming and software technologies. I plan to publish a free Java certification course to prepare you for the “Java Foundations” official Oracle certificate.

Functional Programming: Overview

$
0
0

I recently published a free video lesson about the concepts of functional programming, where I explained and demonstrated the functional programming paradigm. Learn more at softuni.org:

Functional programming (FP) is a style of programming based on composing pure functions, while avoiding shared state, mutable data, and side-effects. It’s important, because most modern mainstream programming languages (like JavaScript, Python, Java and C#) support the functional paradigm with lambda functions and higher-order functions.

In this lesson I explain and demonstrate through live coding examples in JavaScript, Python, Java and C# the concepts of functional programming, pure functions, first-class functions, lambda functions, higher-order functions, and how to combine these concepts to implement filtering, mapping, ordering and other transformations over sequences of elements.

Functional Programming Overview: Video Lesson

What is Functional Programming?

Functional programming (FP) is programming based on composing pure functions, while avoiding shared state, mutable data, and side-effects. Functional programs are sequences of transformations of data through functions. In pure functional programming functions and programs don’t have state, which means that functions do not hold shared data. They only access their input arguments and return an output. I will give some examples in the video.

Functional programming is declarative programing approach (not imperative), which means that instead of describing an algorithm how to do something step by step, functional developers describe the result by functions and compositions of functions.

The program state flows through pure functions, where one function passes its output data as input to other function.

Pure Functions

What is a “pure function“? It is a function, which returns a value only determined by its input, without side effects. Printing something at the console or storing something in a database are examples of side effects. Therefore, using pure functional programming is often impractical.

Modern languages use elements of functional-style programming and are not purely functional.

Examples of pure functions are: the square root function: “sqrt of x“, which takes a number as input and returns another number as output, and the function “sort of list“, which takes a list as input and returns a new list as output. Both functions have no side effects: they don’t change anything; they don’t read or write external data; and they do not use state. They are pure functions.

Pure functions are the heart of the functional programming. Using “pure functions” means maintaining “consistent results“. If you invoke a pure function many times with the same input data, it will have the same consistent behavior and will return the same result, because it have no state and no interaction with the external data or components. Pure functions produce predictable results and behavior and sometimes their correctness can be mathematically proven.

This is the most important principle in functional programming: to build programs by composition of stateless pure functions without side effects.

Functional Languages

Purely functional languages (like Haskell) are unpractical for most real-world projects and are rarely used.

Modern programming languages are much more practical, so they implement the functional paradigm, along with other paradigms like structured programming and object-oriented programming.

There are many functional programming languages and languages that incorporate functional paradigms into modern software development. Most modern languages are not functional, but support concepts for functional programming.

Purely Functional Languages

Purely functional languages are unpractical and rarely used, because it is more complicated to program without maintaining a state. Purely functional developers need to switch their thinking style from the traditional “algorithmic thinking” to “functional thinking“. The program in the purely functional languages is a pure function (which calls other pure functions) without side effects. An example of purely functional language is Haskell, which is not widely used in practice, but it has a great value in learning the functional programming paradigms.

Impure Functional Languages

Impure functional languages are used more often because they allow exceptions from the concept of “pure functions” and simplify the work of developers. These languages emphasize the functional style but sometimes allow side effects.

An example of impure functional language is Clojure. It is not very popular in practical software development.

Multi-Paradigm Languages

Multi-paradigm languages combine the strengths of both the functional and the algorithmic (or imperative) world. Most of today’s widely used general-purpose programming languages are multi-paradigm. They combine multiple programing paradigms: functional programming, declarative programming, structured programming, imperative programming, object-oriented programming, component-based programming, event-driven programming, asynchronous programming, and many others.

Examples of popular general-purpose multi-paradigm programming languages are: JavaScript, C#, Python, Java, PHP, C++, Go, Swift and TypeScript.

All these languages combine multiple concepts and paradigms for structuring the program to simplify the work of developers and improve their efficiency and performance.

The Functional Paradigm in Action

This is an example, which demonstrates the functional style of programming, compared to the traditional imperative (or structured) programming style. We want to write a C# program to read several numbers, find the biggest of them and print it.

Functional Style Example in C#

To solve this problem in a functional style, we can write the following code:

Console.WriteLine(
  Console.ReadLine()
    .Split(" ")
    .Select(int.Parse)
    .Max()
);

Imperative Style Example in C#

Now, let’s see the equivalent imperative style for the same program, again in C#. This is a piece of code, written in a structured programming style (procedural style). It consists of sequence of commands and each command takes its input from a variable, calculates a new result and stores it in a variable:

var input = Console.ReadLine();
var items = input.Split(" ");
var nums = items.Select(int.Parse);
var maxNum = nums.Max();
Console.WriteLine(maxNum);

Functional Programming – Live Demo

We can see the code from the previous examples in action:

Lambda Functions

In programming, lambda functions are short expressions that transform an input into an output.

Lambda functions are typically used as arguments to other functions, and this is supported by most modern programming languages. For example, a sorting function may accept as a parameter a lambda function, which implements the comparison between two objects.

For better understanding this concept, let’s see some examples of lambda functions in JavaScript, Java, Python and C#.

The first example is a lambda function in C#:

x => 2 * x

The next example is a lambda function in JavaScript:

x => 2 * x

The next example is a lambda function in Python:

lambda x: 2 * x

First-Class Functions

JavaScript, Python, C# and Java support “first-class functions“. This concept means that functions can be stored in variables and can be passed as arguments to other functions. These languages support expressions of type “function”, which hold programming logic to transform some input into some output.

Lambda functions are the simplest way to write an expression of type “function”. Once we have a variable, which holds a function, we can invoke it. Let’s review some examples.

This example in JavaScript shows how to define a variable, which holds a lambda function as its value, and how to invoke it with certain argument:

let twice = x => 2 * x;
let d = twice(5);  // 10

The next example implements the same code in Python:

twice = lambda x: 2 * x
d = twice(5)  # 10

This is the same code in C#:

Func<int, int> twice = x => 2 * x;
var d = twice(5);  // 10

The same code can be written in Java, and it looks very similar:

Function<Integer, Integer> twice = x -> 2 * x;
var d = twice.apply(5);  // 10

First-class functions are an important concept in programming. They allow functions and methods to take other functions as arguments. And this is very powerful tool for many situations.

First-Class Functions – Live Demo

The following live demonstration illustrates how to use first-class functions in JavaScript:

Higher-Order Functions

Higher-order functions take other functions as arguments and thus they can implement abstract behavior. For example, an aggregation function may accept as an argument the aggregation operator (which is a lambda function).

Let’s see how this happens in action. We can create functions, which calculate something, but what exactly depends on their arguments.

Higher-Order Functions – Example

Let’s take an example: the function “aggregate“. It takes 3 parameters: start, end and func. The function aggregates the result from the given function over the numbers from start to end:

function aggregate(start, end, func) {
  for (var result = start, i = start+1; i <= end; i++)
    result = func(result, i);
  return result;
}

For example, the above function can multiply the numbers from 1 to 10, or it can sum the numbers from 20 to 30.

In the body of the “aggregate” function we apply the function “func” many times in a loop, for the numbers from “start” to “end“. The start number, end number and the aggregation function come as arguments.

This function is a good example, which illustrates the power of “higher-order functions” in functional programming. The function “aggregateaccepts as parameter another function, which combines two values during the aggregation process.

Invoking a Higher-Order Functions – Example

This is an example how we can invoke this higher-order function: we sum the numbers from 1 to 10. The start argument is 1. The end argument is 10. The aggregation function is “a + b“. It sums its arguments:

aggregate(1, 10, (a, b) => a + b)  // 55

This is an example how we can invoke the same higher-order function to multiply the numbers from 1 to 10:

aggregate(1, 10, (a, b) => a * b)  // 3628800

This last example demonstrates how we can append together the numbers from 1 to 10, using the same higher-order function:

aggregate(1, 10, (a, b) => '' + a + b)  // "12345678910"

The aggregation function here is different: it appends its arguments as text.

Invoking a Higher-Order Functions – Live Demo

This live code demonstration illustrates how to use higher-order functions in JavaScript. It holds the above examples:

Subscribe to My YouTube Channel

Do you like this free programming lesson? Do you want more? Subscribe to my YouTube channel to stay in touch with my free coding courses, lessons and tutorials:

Join the “Learn to Code” Community

Join the SoftUni global learn-to-code community at softuni.org to get free access to the practical exercises and the automated judge system for this course. Get free help from mentors and meet other learners. It’s free!

Happy coding!

Object-Oriented Programming (OOP) – Basic Concepts

$
0
0

I published a new video lesson for beginners, where I explain the concepts of the object-oriented programming (OOP) with live code examples. The video is short, but is very informative and explains the OOP principles in a clear and easy to understand way, briefly, concisely, and in simple words. Learn about objects, classes, interfaces and inheritance in this short video with code examples in C# and JavaScript:

OOP Overview – Video Lesson

What Shall You Learn about OOP From This Lesson?

In this lesson I briefly explain and demonstrate the concept of OOP (the object-oriented programming), which is basically the concept of using classes and objects to model the real world in your programming language.

I explain the concepts of classes (which define the structure for the objects), data fields (which hold data) and properties (which provide access the data fields), and the concept of object state, as well as the actions, defined in the classes (which in OOP are called methods).

I show some live coding examples in C# and JavaScript where I define a class, instantiate objects from this class, and access the object’s data and call the methods of the object.

Later, I explain the concepts of inheritance, interfaces and abstract classes in OOP and provide a real-world example. I define an abstract class with an abstract method in it and inherit this base class into two child classes, where I override the inherited abstract methods to provide a specific implementation. Finally, I demonstrate how to use these abstract class and the child classes derived from it.

Object-Oriented Programming (OOP)

Object-oriented programming (OOP) is the concept of using classes and objects to model the real world.

  • Classes are sets of data fields, together with methods (which are functionality to interact with the data fields and other objects). Classes define the structure of information objects: the data they holds and the operation they can perform.
  • Objects are instances of the classes, holding certain values in their data fields.

Let’s look at this simple example of class definition:

class Rectangle {
  int width, height;
  int CalcArea() {
    return width * height;
  }
}

The code above defines the classRectangle“, which holds two data fields: width and height (integer values). It defines a method, holding the code to calculate the area of the rectangle.

We can have several objects of this class “Rectangle“.

  • The first object is a rectangle of width 5 and height 6.
  • Another object has width 6 and height 4.
  • Some other object has width 7 and height 3.

We have one class “Rectangle” and 3 objects (or instances) of this class.

  • The class holds the definition (the specification, the model, the template) for the objects. It defines the data fields and methods and more details (in some cases).
  • Classes don’t hold data. They hold data definitions and operation definitions.
  • Objects hold values for the data fields in the class. Objects of class “Rectangle” hold data about certain rectangle. Objects are information structures, holding data.
  • Typically, one class has multiple objects (or instances).

Classes and objects are the building blocks of the object-oriented programming (OOP) and they come together with some other OOP concepts like abstraction, interfaces, data encapsulation, inheritance, polymorphism and exception handling.

Examples of Classes and Objects in C# and JS

To demonstrate how classes and objects work in programming, I have prepared these examples in C# and JavaScript:

These examples demonstrate that in programming we can define classes, which model real-world entities. They hold data (properties) and operations, just like in the real world. Objects are instances of the class definition with certain data characteristics, just like objects in the real world.

Inheritance, Interfaces and Abstract Classes

Let’s continue with the concepts of inheritance, interfaces and abstract classes in the OOP, with a real-world example.

I can define an abstract class Figure with an abstract method calcArea() in it, and I can inherit this base class into two child classes (Circle and Rectangle), where I can override the inherited abstract method to provide a specific implementation for the area calculation. Finally, I can use this abstract class and the derived child classes as building block in my code.

Inheritance and interfaces are two other major concepts in the object-oriented programming.

  • Inheritance allows classes to inherit data and functionality from a parent class (also called “base class”). When a class inherits another class, the parent class fields are merged with the child class fields and they together form the set of data fields for the child class.
  • Interfaces defines abstract actions. These are actions to be implemented in the descendent classes. Interfaces define a set of empty (or abstract) methods (or actions), which shall be obligatory implemented in the child classes. Interfaces are also called “contracts“, because they define certain set of functionalities, a contract to implement certain methods.

Abstract and concrete classes are quite important when we model the real-world with the concepts from OOP.

  • Abstract classes are used to model abstractions. For example, the class Figure is not a concrete figure like square or rectangle, but the concept or the abstraction of “figure”. Abstract classes defines data + actions (or normal methods) + abstract actions (or empty methods). Abstract classes are designed to be inherited (or extended).
  • Concrete classes like Circle and Rectangle represent real entities, not abstractions. Concrete classes define data fields + concrete functionality (methods). They can implement interfaces and inherit abstract and other classes.

Inheritance and Interfaces – Example

In this example I demonstrate abstract classes and concrete classes. This is an example of abstract class, which models an abstraction “Figure“:

abstract class Figure {
  int x, y;
  abstract int calcArea();
}

The above code defines the base abstract class Rectangle with two data fields: x and y. It defines also an abstract action (or method) for calculating the area of the figure. This method is empty (or abstract), because it is specific to the concrete figure, like “circle” or “rectangle“. In the child (or descendent) classes this abstract action will become concrete, it will hold the code to calculate a circle area or rectangle area or other, depending on the concrete figure. This abstract class models the generic abstraction “Figure” and child classes will determine the type of the figure.

Please, don’t focus on the programming language. Focus on the OOP concepts now.

The abstract method calcArea() returns an integer value. It will be invoked by the child classes later.

This is an example of how we can define a child class “Circle”, which inherits from the abstract class “Figure”:

class Circle extends Figure {
  int radius;
  override int calcArea() =>
    PI * radius * radius; 
}

The above class inherits the fields “x” and “y” from “Figure” and appends an additional field “radius“. This way the child class has 3 fields: two inherited from the parent class and one defined additionally. The class Circle defines a concrete implementation of the abstract method calcArea(), which calculates the circle area using the well-known formula from the school-level math.

This is an example definition of another child class “Rectangle”, which inherits from the same base class Figure:

class Rectangle extends Figure {
  int width, height;
  override int calcArea() =>
    width * height; 
}

The “Rectangle” class defines two additional fields: width and height. It provides different concrete implementation of the calcArea() abstract method, which calculates the rectangle area.

This is a very good example of abstract and concrete classes. Abstract classes model common (or generic) data and functionality, and concrete classes model concrete entities and concrete implementations of the abstract actions from the parent class.

Note that the programming languages doesn’t matter for this examples. This configuration of parent class + child classes demonstrates an important concept from the object-oriented programming, which we shall learn in detail later. This example illustrates two main object-oriented programming concepts: inheritance and polymorphism.

Examples of Inheritance in OOP

To demonstrate how to use interfaces, abstract classes and inheritance in OOP, I have prepared these examples in C# and JavaScript:

Play with them to learn the concept of inheritance.

Subscribe to My YouTube Channel

Do you like this free programming lesson? Do you want more? Subscribe to my YouTube channel to stay in touch with my free coding courses, lessons and tutorials:

Join the “Learn to Code” Community

Join the SoftUni global learn-to-code community at softuni.org to get free access to the practical exercises and the automated judge system for this course. Get free help from mentors and meet other learners. It’s free!

Happy coding!

Viewing all 21 articles
Browse latest View live